LG Freezer Not Cooling? Quick Fix Guide
When your LG freezer stops working, the clock starts ticking on potentially hundreds of dollars of frozen food. This comprehensive troubleshooting guide walks you through the most common causes, from simple power issues to complex component failures, helping you diagnose the problem efficiently and decide between DIY repair and professional service. Whether your freezer is completely unresponsive, running too warm, or building up excessive frost, the diagnostic steps and solutions outlined here will help you restore proper cooling and protect your investment.
Confirm Power Supply Issues First
Before assuming a major mechanical failure, work through these fundamental checks that resolve a surprising number of “freezer stopped working” scenarios. Electrical and power-related problems account for the majority of apparent freezer failures and can often be identified and fixed without any tools or specialized knowledge.
Start by confirming that your freezer is actually receiving power. The power cord on many LG models plugs into an outlet located behind the refrigerator, and this connection can become dislodged if the unit has been moved for cleaning or maintenance. Verify that the plug is securely inserted into the outlet, then test the outlet itself by plugging in a different device like a lamp or phone charger. If the outlet is dead, check your home’s electrical panel for a tripped breaker and reset it if necessary.
Examine the power cord for visible damage including kinks, fraying, or burn marks that might indicate internal wire failure. If the cord shows any signs of damage, stop using the freezer immediately and arrange for replacement. Some LG models include internal fuses that blow during power surges, and these can be accessed by removing the lower rear access panel once the unit is unplugged.
If power reaches the freezer but nothing happens when you try to operate it, the control interface may have frozen or malfunctioned. Try resetting the control system by pressing and holding the Power Freeze and Power Cool buttons simultaneously for three to five seconds on most LG models. This reset often restores normal operation when the electronics become confused due to temporary glitches or power fluctuations.
Decode Error Codes Quickly
LG freezers display error codes when the diagnostic system detects malfunctions, and learning to interpret these codes dramatically accelerates troubleshooting. Access diagnostic mode by pressing and holding the Refrigerator and Ice Plus buttons simultaneously for approximately five seconds, depending on your specific model. The display will cycle through temperature readings and error codes that pinpoint failing components.
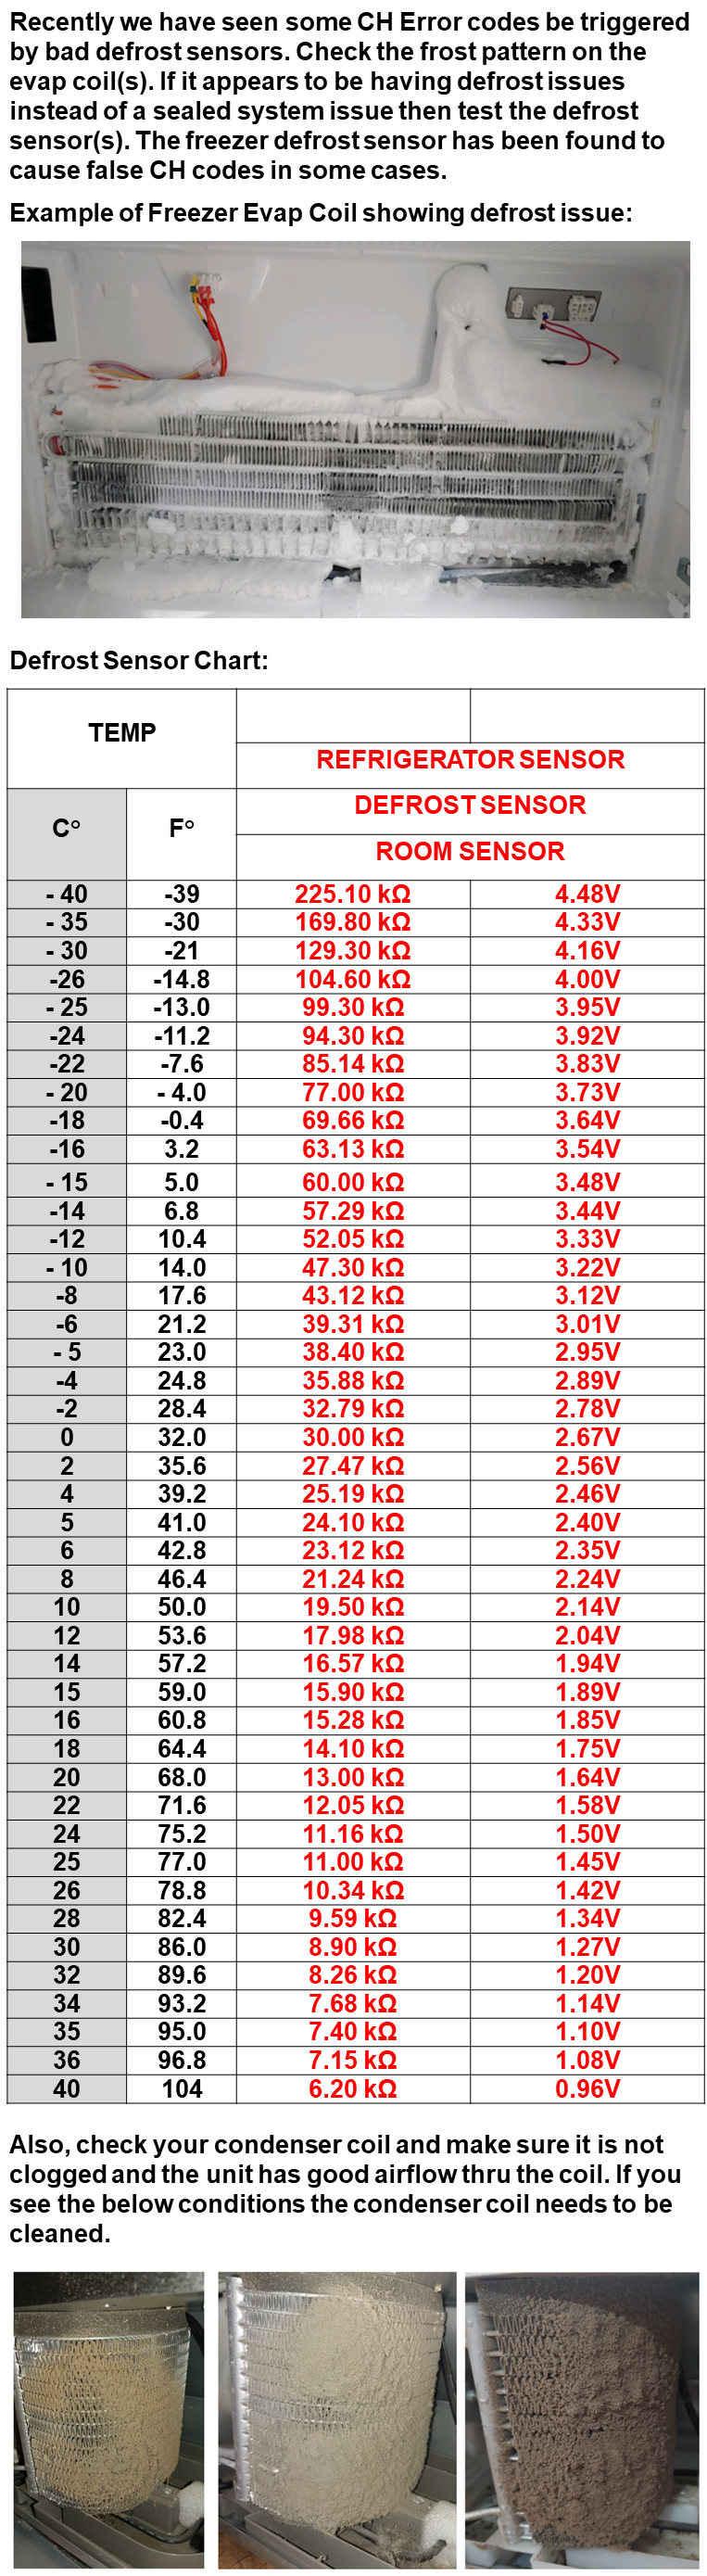
Error codes beginning with “Er IF” indicate evaporator fan errors, signaling that the fan is not spinning at expected speeds or has failed entirely. The “Er CF” code points to condenser fan problems or restricted airflow through the condenser area. Codes containing “dH” relate to defrost heater circuit issues, typically an open circuit from a burned-out heater or damaged wiring. Temperature sensor failures display as “rS” for refrigerator sensor problems or “rF” for freezer sensor failures.
Once you’ve identified the error code, clear it by unplugging the refrigerator for two minutes to allow the control board to reset, then restore power. Observe whether the error code reappears during normal operation. If the same code returns, you’ve confirmed which component requires attention and can proceed with targeted testing and replacement rather than random part guessing.
Compressor and Motor Issues
The compressor serves as the heart of your freezer’s refrigeration system, and compressor-related problems represent some of the most serious and costly repair scenarios. Understanding how compressor failures manifest helps you distinguish between repairable starting component issues and situations requiring professional service.
When the compressor fails to start, you typically hear clicking sounds from the rear of the unit as the start relay attempts to engage the compressor, followed by a brief hum and another click as the relay disengages. This repeating cycle indicates that power reaches the compressor but the motor cannot start, usually due to a failed start relay, faulty start capacitor, or seized compressor internal mechanism.
Test the start relay by removing it from its socket on the compressor terminals and shaking it gently. Audible rattling indicates internal contact failure. Use a multimeter to check continuity between terminals—replace the relay if continuity tests fail. The start capacitor provides additional starting torque for the compressor and often fails before the compressor itself. Inspect for bulging tops or fluid leakage, and test capacitance with a multimeter capable of that function.
If starting components test good, test compressor windings by measuring resistance between the three terminals labeled S (start), R (run), and C (common). The resistance between S and R should equal the sum of S to C plus R to C. Open circuits between terminals or significantly different values indicate internal compressor failure requiring professional replacement.
Airflow Problems Explained

Proper airflow distribution is essential for consistent temperatures throughout the freezer compartment. When airflow becomes restricted, you’ll notice warm spots, uneven cooling, and progressively worsening performance as frost accumulates and blocks vents.
Blocked air vents represent the most common airflow problem. LG freezers use strategically positioned vents to distribute cold air from the evaporator to all compartments, and these openings can become obstructed by containers, ice buildup, or food items pressed against them. Inspect all visible air vents inside the freezer, typically located on the back wall, sides, or in the ceiling of French door models, and ensure nothing impedes airflow.
The evaporator fan circulates cold air over the evaporator coils and throughout the freezer. When this fan fails, the freezer may still produce cooling near the evaporator but cannot distribute it effectively to the main compartment. Symptoms include warm temperatures despite the compressor running, with the most pronounced warmth near the back wall where the evaporator resides. Access the fan by removing the freezer back panel after emptying the compartment and disconnecting power. Manually rotate the fan blade to check for binding, and test for voltage at the motor terminals during cooling cycles.
The condenser coils and fan release heat extracted from the freezer interior to the surrounding environment. When coils become coated with dust, pet hair, or household debris, heat dissipation suffers and the cooling system works less efficiently. Clean condenser coils every six to twelve months by unplugging the refrigerator and using a coil brush or vacuum with brush attachment to remove accumulated debris from between coil fins.
Temperature Sensor Failures
LG freezers employ multiple temperature sensors and thermistors to monitor cooling performance and communicate with the electronic control system. Sensor failures can trigger error codes, cause the system to behave as if the freezer has failed when it hasn’t, or prevent proper temperature regulation.
The thermistor is a temperature-sensitive resistor that sends temperature data to the control board. When a thermistor fails, it may send inaccurate readings that cause the compressor to run too much, too little, or not at all. Symptoms include temperature fluctuations that don’t match control panel settings, error codes related to temperature sensing, or the freezer running continuously without reaching set temperatures.
Test thermistor resistance by disconnecting the sensor and measuring resistance with a multimeter. At room temperature of approximately seventy degrees Fahrenheit, a functioning thermistor typically reads between five and fifteen kilo-ohms depending on the model. Significant deviation from specifications indicates a failed sensor requiring replacement. Compare readings to manufacturer specifications for your specific model.
LG refrigerators typically have multiple sensors including freezer, refrigerator, and evaporator sensors. The freezer sensor is usually located on the back wall or ceiling of the freezer compartment, while the evaporator sensor clips onto the evaporator coils behind the access panel. Replace sensors by disconnecting the electrical connector, removing the mounting clip, and installing the new sensor in the same location and orientation.
Defrost System Repair
Frost accumulation exceeding one-quarter inch on freezer walls indicates a problem with the automatic defrost system. While some frost formation during normal door openings is expected, excessive buildup progressively restricts airflow and impairs cooling performance until the system fails entirely.
The defrost heater warms the evaporator coils at regular intervals to melt frost that accumulates during cooling cycles. When the heater burns out or develops an open circuit, frost builds up on the coils until it restricts airflow or triggers temperature sensor failures. Access the heater behind the evaporator panel and test for continuity with a multimeter—replace if the reading shows infinity rather than continuity.
The defrost thermostat monitors evaporator temperature and signals the control board when coils have warmed enough for defrost to begin. If the thermostat fails open, the defrost heater never activates. If it fails closed, the heater may activate continuously. Test the thermostat by placing it in ice water and checking for continuity when cold versus open when warmed above approximately fifty degrees Fahrenheit.
Modern LG freezers use the main control board to manage defrost cycles rather than separate mechanical timers. The board activates the defrost heater through a relay for predetermined intervals based on compressor run time. If the heater and thermostat test good but frost still accumulates, the control board may not be initiating defrost cycles. Check for voltage at the heater connection during what should be a defrost cycle—absence of voltage indicates a control board problem.
When to Call a Professional
Certain symptoms and situations warrant professional service from a qualified technician with specialized tools and certification. Recognizing these scenarios prevents personal injury, further damage, and voided warranties.
Refrigerant system problems require EPA-certified technicians who can legally handle refrigerants and perform brazing repairs on sealed systems. Any indication of refrigerant loss—compressor running continuously without achieving proper temperatures, ice buildup on the refrigerator exterior, or hissing sounds from the back—indicates a potential leak requiring professional repair.
Compressor replacement and refrigerant system repairs need specialized tools including vacuum pumps, refrigeration gauges, and brazing equipment. The cost of these repairs often approaches fifty to seventy percent of a new unit’s price, making replacement economically preferable for units over ten years old.
If multiple components appear to have failed simultaneously or error codes persist after component replacement, the control board or wiring harness may be the root cause. Diagnosing system-level electronic problems requires circuit diagrams and specialized knowledge beyond typical consumer access.
Prevention and Maintenance
Implementing regular maintenance extends refrigerator life, maintains energy efficiency, and prevents many common failures before they occur. Most tasks require only basic tools and household cleaning supplies.
Clean condenser coils every six to twelve months by accessing them through the lower rear panel or front kick plate. Use a coil brush or vacuum with brush attachment to remove dust and debris between coil fins. This simple task prevents the compressor from working overtime due to poor heat dissipation.
Monthly, check that freezer temperature remains between zero and five degrees Fahrenheit using a separate thermometer. Verify door seals are clean and undamaged by closing a dollar bill in the door and confirming it resists removal. Clean door seals with mild soap and water to ensure proper sealing.
Quarterly, clean the freezer interior with a baking soda solution to neutralize odors and remove food residue. Inspect ice maker components if equipped and clean the ice bin if ice has accumulated. Ensure adequate clearance around the refrigerator—at least two inches on the back and sides—for proper ventilation.
Repair or Replace Decision Guide
When facing significant repair costs, evaluate whether repair or replacement offers better long-term value based on age, repair costs, and energy efficiency improvements in newer models.
A commonly cited guideline is that repairs costing more than fifty percent of a comparable new unit’s price are not economically justified. Adjust this threshold based on the unit’s overall condition, repair history, and expected future reliability.
Most LG refrigerators have an expected service life of ten to fifteen years with proper maintenance. If your freezer is approaching or exceeding this age, replacement likely offers better long-term value even if current repair costs seem reasonable. Newer models also provide substantially improved energy efficiency—refrigerators manufactured before 2014 are significantly less efficient than current models due to updated energy standards.
Consider calling an authorized LG service provider to obtain a professional assessment and quote. Authorized technicians have access to genuine LG parts, technical training, and specialized tools. Compare the professional quote against the cost of a new energy-efficient model, factoring in installation costs and potential energy savings, before making your final decision.