KitchenAid Freezer Not Making Ice? Fix It Fast
Nothing disrupts your daily routine like reaching for ice only to discover your KitchenAid freezer has stopped producing cubes. Whether you’re hosting a gathering or simply craving a cold drink on a warm day, this malfunction creates immediate frustration. The good news is most KitchenAid freezer not making ice issues stem from common, easily fixable problems—many of which you can resolve yourself without professional help. This guide walks you through precise diagnostic steps to identify and fix your specific ice production failure, getting your KitchenAid refrigerator back to peak performance.
Modern KitchenAid refrigerators feature sophisticated ice-making systems with multiple potential failure points, which can feel overwhelming when your ice supply runs out. However, by approaching the problem methodically and understanding how these systems work, you can efficiently pinpoint the exact cause. Whether it’s a simple setting adjustment, temperature issue, or mechanical blockage, this troubleshooting sequence follows the logical path technicians use to diagnose ice maker problems, saving you time and unnecessary service calls.
Verify Your KitchenAid Ice Maker Is Actually Producing Ice
Before assuming your ice maker has failed completely, confirm whether it’s actually producing ice cubes. Many homeowners mistakenly believe their KitchenAid freezer not making ice when the real issue involves ice delivery rather than production. This critical distinction determines your entire troubleshooting approach.
Remove the ice storage bin and carefully examine its contents. If you find ice cubes present—even if they’re clumped together—your ice maker is functioning properly, and the problem lies with the dispensing mechanism. Conversely, an empty bin or one containing only malformed ice cubes confirms a production failure requiring deeper investigation. Take note of the ice appearance: small, hollow cubes indicate water supply issues, while cloudy or discolored ice suggests contamination or temperature problems. Never assume the ice maker has failed without physically checking the bin first, as this saves hours of unnecessary troubleshooting.
Once you’ve confirmed production status, your next steps become clear. If ice exists but won’t dispense, focus on bin installation, dispenser mechanisms, and control settings. If no ice is being produced, shift your attention to water supply, temperature settings, and the ice maker assembly itself. This initial diagnosis prevents wasted time checking irrelevant components and accelerates your path to a working ice maker.
How to Check for Partial Ice Production
KitchenAid ice makers operate in cycles, producing batches of ice every 60-90 minutes under ideal conditions. If your ice maker has recently experienced a power interruption or temperature fluctuation, it may be mid-cycle rather than completely failed. To verify partial production:
- Remove the ice bin and inspect the ice maker’s mold assembly directly
- Look for partially formed cubes still attached to the mold
- Check for water dripping into the mold, indicating the fill cycle is functioning
- Listen for the motor attempting to rotate the ejector arms
If you observe any of these signs, your ice maker is operational but experiencing a temporary interruption. Allow several hours for the production cycle to complete before proceeding with further diagnostics. This simple check prevents unnecessary part replacements for what might be a normal operational delay.
Disable Your KitchenAid Refrigerator’s Control Lock
Many KitchenAid freezer not making ice concerns stem from the dispenser control lock feature being accidentally activated. This safety function prevents accidental dispensing by children or pets but often gets mistaken for a mechanical failure when owners can’t access ice.
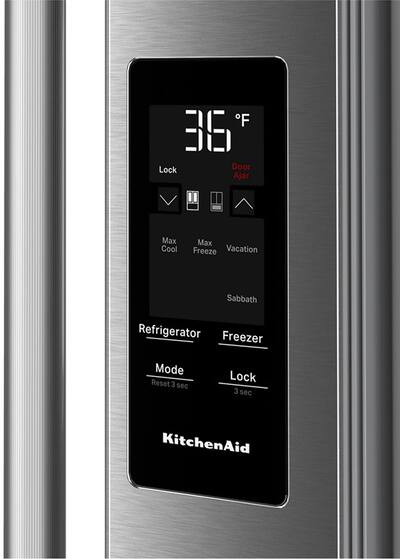
When the control lock engages, a distinctive lock symbol illuminates on your refrigerator’s display panel, providing visual confirmation that dispensing functions have been disabled. Crucially, this feature doesn’t shut down the refrigerator, stop ice production, or turn off interior lighting—it purely prevents the touch controls and dispensing mechanism from responding to input. Many frustrated owners call for service when they’ve simply activated this feature during routine cleaning or when reaching for items near the control panel.
To deactivate the control lock on most KitchenAid models, locate the lock button on your dispenser panel and press and hold it for approximately three seconds. The lock symbol should extinguish, confirming that dispensing functions have been restored. However, procedures vary across model generations, so consult your Owner’s Manual for precise instructions specific to your refrigerator. After disabling the lock, test dispensing by requesting ice to confirm normal operation has returned—this simple fix resolves what appears to be a serious KitchenAid freezer not making ice problem in minutes.
Exit Sabbath Mode on Your KitchenAid Refrigerator
Sabbath Mode represents another common culprit behind KitchenAid freezer not making ice issues. Designed for religious observances requiring appliance deactivation during specific periods, this mode alters multiple refrigerator functions in ways that alarm uninformed owners.
When Sabbath Mode engages, several system changes occur simultaneously. The electronic control panel’s LED display goes dark, with only the Sabbath button remaining illuminated. Both ice and water dispensing become completely non-operational, explaining why many users panic when ice production appears to have stopped. Interior lighting extinguishes and remains off regardless of door opening, and the refrigerator ignores door ajar alarms that would normally sound. Temperature settings remain stable throughout Sabbath Mode operation, preserving food safety without owner intervention.
This mode frequently gets accidentally enabled when cleaning the control panel or when objects stored near the refrigerator press against the Sabbath button. To deactivate, look for the Sabbath button—often marked with an “S” or religious symbol—and press and hold it for three seconds until the display returns to normal. After exiting Sabbath Mode, allow several hours for ice production to resume normally, as the ice maker needs time to complete its production cycle. Always check for Sabbath Mode activation before assuming mechanical failure, as this prevents unnecessary service calls for what’s simply a feature designed to temporarily disable dispensing functions.
Properly Seat Your KitchenAid Ice Storage Bin

KitchenAid refrigerators with indoor ice-making systems require the storage bin to be fully seated and properly secured for ice production to function correctly. Improper installation—whether from incomplete insertion during cleaning or incorrect positioning after maintenance—causes many apparent production failures.
The ice storage bin connects to the ice maker assembly through alignment pins and electrical contacts. If these connections don’t establish proper contact due to incomplete seating, the ice maker receives no signal that a bin is present, effectively disabling production. Some models include a bin presence sensor that halts operation when it fails to detect the storage container.
To verify correct installation:
1. Pull the ice bin out completely and examine its mounting area
2. Remove any accumulated frost or ice fragments that might interfere with seating
3. Slide the bin back in slowly, ensuring it moves smoothly along its guides
4. Confirm it sits level and secure without visible gaps between it and the freezer wall
5. Listen for the subtle click or snap as the mounting mechanism engages
Consult your Owner’s Manual for model-specific installation instructions, as bin designs vary across KitchenAid product lines. Pro Tip: When reinstalling the bin, tilt it slightly upward as you slide it in to ensure the rear mounting pins properly engage with the receptacles—this simple technique prevents many “KitchenAid freezer not making ice” issues related to bin installation.
Clear Ice Clumps Blocking Your KitchenAid Dispenser
Ice cubes naturally clump together over time due to humidity exposure, and accumulated ice fragments can block the dispenser chute, creating the appearance of production failure when ample ice actually exists within your freezer. This common issue affects households that don’t dispense ice daily.
When clumped ice blocks the delivery chute, the dispenser mechanism cannot deliver ice to your glass even when the ice maker continues producing cubes. The storage bin may appear full, yet dispensing produces nothing or only fragments. Regular maintenance prevents this accumulation from interrupting service.
To clear blockages and clean the delivery mechanism:
– Remove the ice storage bin and examine the dispenser opening
– Use a warm, damp cloth to wipe down the chute interior, softening any ice accumulations
– Never use metal utensils or sharp objects to chip away ice, as these can damage the dispenser mechanism
– For stubborn clogs, apply warm water with a cloth and allow it to sit for several minutes before gently removing softened ice
– Dry all surfaces thoroughly to prevent immediate refreezing
In households that don’t use ice regularly, perform this cleaning procedure every two weeks to maintain reliable dispensing. Pro Tip: After cleaning, add a small amount of cooking oil to the bin’s interior surfaces to create a non-stick barrier that prevents future ice clumping.
Confirm Your KitchenAid Freezer Temperature Is Cold Enough

Ice production requires specific temperature conditions within your freezer compartment. When temperatures rise above approximately 5°F (-15°C), ice formation slows dramatically or stops entirely, leaving you without ice despite a functioning ice maker assembly.
The recommended freezer temperature for optimal ice production is 0°F (-18°C), which ensures rapid freezing and consistent ice cube formation. Temperatures above this threshold, while still cold enough to preserve food, don’t provide the conditions needed for efficient ice making.
Access your refrigerator’s temperature controls and verify that the freezer setting is at 0°F or lower. If you’ve recently adjusted the setting, allow 24 hours for the compartment to reach the new target temperature before evaluating ice production. During this stabilization period, avoid opening the freezer door unnecessarily. Also inspect your door seals for damage or contamination that might allow warm air infiltration—worn door seals are a common cause of freezer temperature instability that directly impacts ice production.
Reset Your KitchenAid Ice Maker Assembly
When electronic glitches disrupt ice maker function, a simple reset often restores normal operation without requiring parts replacement. This procedure clears temporary faults and reinitializes the ice maker’s control system.
To reset your ice maker:
1. Unplug the refrigerator from its wall outlet or turn off the circuit breaker
2. Leave the refrigerator without power for approximately one full minute
3. Restore power and allow the refrigerator to resume normal operation
4. Check the ice storage bin after 4-6 hours for initial ice production
This brief disconnection allows the ice maker’s circuit board to completely discharge, eliminating any erroneous fault readings. Pro Tip: After resetting, manually advance the ice maker cycle by lifting the wire shutoff arm to test functionality immediately—this bypasses the normal delay period and confirms whether the reset was successful.
Schedule Professional Service for Persistent KitchenAid Ice Maker Issues
If your troubleshooting efforts haven’t resolved the ice production problem, professional diagnosis may be necessary. KitchenAid offers multiple support channels to assist customers experiencing appliance concerns.
U.S. customers can schedule service appointments online or contact customer service directly at 1-800-422-1230. Canadian customers should utilize KitchenAid Canada’s dedicated service resources. Before scheduling service, gather your model’s serial number and note exactly when the ice production problem began. Consider whether your refrigerator is covered under an extended service plan, which can significantly reduce or eliminate out-of-pocket repair costs for covered components like the ice maker assembly.
Final Note: Most KitchenAid freezer not making ice issues resolve with these simple troubleshooting steps. By methodically working through each potential cause—from control settings to temperature conditions—you’ll likely restore ice production without professional help. For persistent problems, KitchenAid’s authorized service network ensures proper diagnosis and repair using genuine replacement parts that maintain your refrigerator’s performance and warranty coverage.