How to Change Thermador Freezer Filter
That sudden metallic taste in your ice or the faint chlorine smell in your water signals it’s time for a Thermador freezer filter change. When your refrigerator’s water and ice lose their crisp freshness, it’s not just an annoyance—it means your filter has reached capacity and can no longer effectively remove contaminants. Regular filter replacement protects your family from waterborne pathogens while preserving your appliance’s performance. This guide gives you everything you need to complete your Thermador freezer filter change correctly the first time, avoiding common mistakes that could lead to leaks or compromised water quality.
Verify When Your Filter Needs Replacement
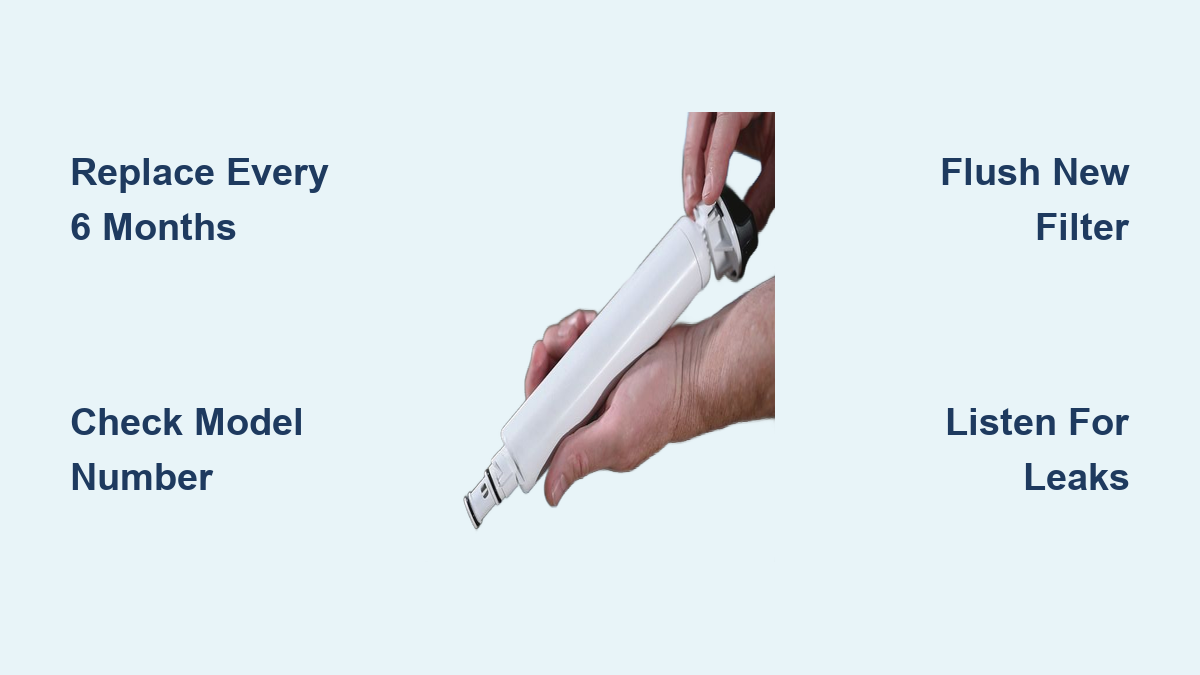
Don’t wait for obvious warning signs before scheduling your Thermador freezer filter change—stick to the manufacturer’s recommended six-month replacement cycle. Thermador specifically instructs homeowners to replace filters every six months or when your refrigerator alerts you, whichever comes first. This schedule isn’t arbitrary; filters become saturated with contaminants over time, eventually releasing trapped particles back into your water supply.
Watch for these critical indicators that demand immediate filter replacement:
– Water develops a noticeable “bleach” smell from unneutralized chlorine
– Sulphurous odors emerge, signaling bacterial presence
– Reduced water flow from your dispenser
– Visible particles or persistent cloudiness in ice cubes
Households with well water or those in areas with hard water should consider replacing filters every three to four months. If you’ve recently noticed changes in your municipal water quality reports, err on the side of caution with more frequent Thermador freezer filter changes to maintain optimal protection.
Locate Your Thermador Model Number Correctly
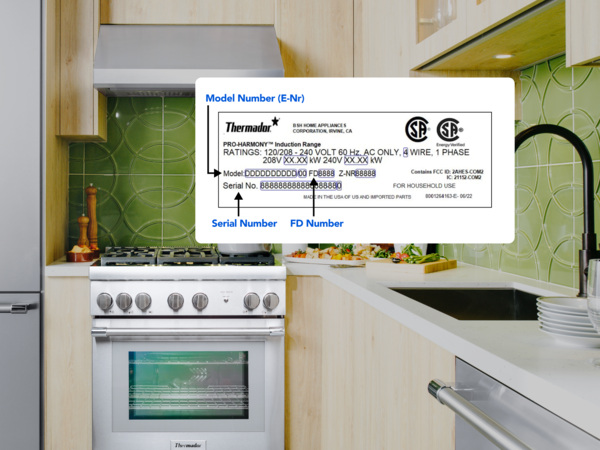
Before purchasing a replacement filter, you must identify your exact Thermador model number—often called the E-Nr in documentation—to ensure compatibility. This step is non-negotiable; using the wrong filter can cause leaks or allow unfiltered water into your system. The model number typically appears inside your refrigerator compartment on a side wall or rear panel, though some models display it externally when doors are open.
When recording your model number, include the complete identifier with the slash and following digits—like T24IF905SP/04 where “/04” is essential. Never omit these suffix digits, as they indicate specific production variations affecting filter compatibility. If you struggle to find or read your model number, call Thermador support at 1-800-735-4328 with your appliance’s serial number ready. Their representatives can verify your model and recommend the correct filter without risking installation issues.
Select the Exact Replacement Filter for Your Model
Thermador has used multiple filter configurations across different refrigerator models, so confirming the correct part number prevents costly mistakes. The most common Thermador water filter replacements include:
– Part #11048053
– Part #00750673
– Part #11032531
– Part #00740572
– Part #11044433
– Part #00491849
For budget-conscious homeowners, the Arrowpure APF-0400 serves as a reliable aftermarket alternative that installs and functions identically to OEM filters. When purchasing, consider multi-packs to save significantly—single filters cost about $9.89, while 5-packs drop to approximately $7.40 per unit. This smart stocking strategy ensures you’re never caught with an expired filter, making your Thermador freezer filter change process seamless when the time comes.
Access Your Filter Housing Without Damage

Most Thermador refrigerators position the water filter at the bottom left front of the appliance, requiring you to bend or kneel for access. Before starting your Thermador freezer filter change, clear any items stored in the lower front compartment and place a towel beneath the housing to catch drips. Never force the filter housing open—most models feature tool-free access designed for simple quarter-turn or push-pull mechanisms.
Inspect the housing area for moisture, mold, or mineral buildup before removing the old filter. If you notice persistent dampness around the housing, investigate potential water line issues before proceeding. Wipe the area clean with a dry cloth to prevent contaminants from entering the system during your filter replacement. This preventative step takes just 30 seconds but avoids introducing new problems during your Thermador freezer filter change.
Execute Proper Filter Replacement Technique
Begin your Thermador freezer filter change by consulting your owner’s manual for model-specific instructions—some filters require counterclockwise rotation while others pull straight out. Grasp the old filter firmly and follow your model’s release mechanism, preparing for minor water discharge by keeping a container ready. Never yank the filter aggressively, as this can damage the housing seals.
When installing the new filter, align it according to the manufacturer’s indicators (usually an arrow showing water flow direction) and push firmly until you hear a distinct click. This audible confirmation ensures proper seating and prevents leaks. If resistance occurs, double-check the filter’s orientation before applying additional pressure—forcing an incorrectly positioned filter causes costly damage to the housing assembly during your Thermador freezer filter change.
Flush Your New Filter Thoroughly
Skipping proper flushing after your Thermador freezer filter change introduces carbon fines into your first glasses of water, causing cloudiness and off-flavors. Run continuous water through the dispenser for five full minutes, collecting the output in a large container. This process removes manufacturing residues and trapped air bubbles that would otherwise affect water quality.
Discard the first three ice batches produced after your Thermador freezer filter change, as the ice maker may have captured carbon particles during initial operation. If cloudiness persists after thorough flushing, repeat the process for an additional five minutes. Never consume water or ice immediately after filter replacement—this critical step ensures your family receives truly clean, great-tasting water from your newly installed filter.
Recognize Early Warning Signs of Filter Failure
Don’t wait for your refrigerator’s alert system to prompt your next Thermador freezer filter change—learn to identify subtle performance declines. A slight reduction in water pressure often precedes complete flow restriction, signaling your filter is nearing saturation. Similarly, ice cubes developing a faint yellow tint indicate the filter can no longer effectively remove organic compounds from your water supply.
Schedule immediate replacement if you notice:
– Metallic aftertaste in drinking water
– Unusual clicking sounds from the water dispenser
– Ice cubes with inconsistent clarity
– Noticeable decrease in ice production speed
These symptoms mean your current filter has exceeded its capacity, compromising both water quality and appliance performance. Addressing them promptly through a timely Thermador freezer filter change prevents more serious issues with your refrigerator’s water system.
Maintain Your Filtration System Long-Term
Extend your Thermador refrigerator’s water system life by incorporating these maintenance habits alongside regular filter changes. Keep a spare filter in a cool, dry place so you can perform your Thermador freezer filter change immediately when needed—never let an expired filter remain in place while waiting for a replacement.
Check your water supply line connections quarterly for leaks or kinks that restrict flow. If you live in an area with hard water, consider installing a whole-house filtration system to reduce mineral buildup in your refrigerator’s water pathways. These preventative measures complement your regular Thermador freezer filter change schedule, ensuring consistent performance and extending the life of your entire water dispensing system.
Troubleshoot Common Filter Replacement Issues
When your new filter won’t seat properly during your Thermador freezer filter change, first verify you have the correct model-specific part. Forcing an incompatible filter creates leaks that damage your refrigerator’s interior. If water continues dripping after installation, check that the filter clicked fully into place—most models require firm, straight pressure without rotation once initial alignment is achieved.
Persistent cloudiness after thorough flushing typically indicates either a defective filter or improper installation. Try reseating the cartridge firmly and flushing for an additional five minutes. If problems persist, contact Thermador support with your model number and filter part number ready—they’ll guide you through advanced diagnostics or arrange service if needed. Never ignore these issues, as they can lead to water damage or compromised filtration.
Regular Thermador freezer filter changes protect your family’s health while preserving your appliance’s performance. By following the six-month schedule, recognizing early failure signs, and executing proper replacement techniques, you ensure clean, great-tasting water and ice for years to come. Keep your model number accessible, maintain a filter inventory, and make this simple maintenance task part of your household routine—your refrigerator (and your family) will thank you.