Freezer Coils Not Freezing? Fix It Fast
Your freezer should maintain a rock-solid 0°F (-18°C) to keep food safely frozen for months. When your freezer coils stop freezing but the refrigerator section still works normally, you’re facing a specific cooling failure that requires targeted diagnosis. You might notice ice cream softening, frost-covered items clumping together, or a thermometer reading 20-40°F instead of the proper sub-zero temperature. This guide delivers actionable steps to identify why your freezer coils aren’t freezing and restore proper performance—whether it’s a simple DIY fix you can complete in minutes or a complex issue requiring professional intervention.
Why Your Freezer Coils Stop Freezing (But Refrigerator Still Works)
Modern refrigerators use a single cooling system where the freezer serves as the primary cooling source, with cold air distributed to the refrigerator section through dedicated channels. When freezer coils fail to freeze while the refrigerator maintains normal temperatures, this points to specific component failures rather than complete system breakdown.
Recognize Critical Temperature Differences
The refrigerator compartment functions adequately at 35-38°F, while the freezer requires temperatures 38 degrees colder to maintain proper freezing conditions. When your freezer coils aren’t freezing, the system may still produce enough cooling capacity for the refrigerator section but falls short of the additional cooling needed for the freezer. Verify actual temperatures using a separate appliance thermometer placed in a cup of water for 24 hours—built-in displays often misread by 10-15 degrees.
Identify Frost Pattern Clues on Coils
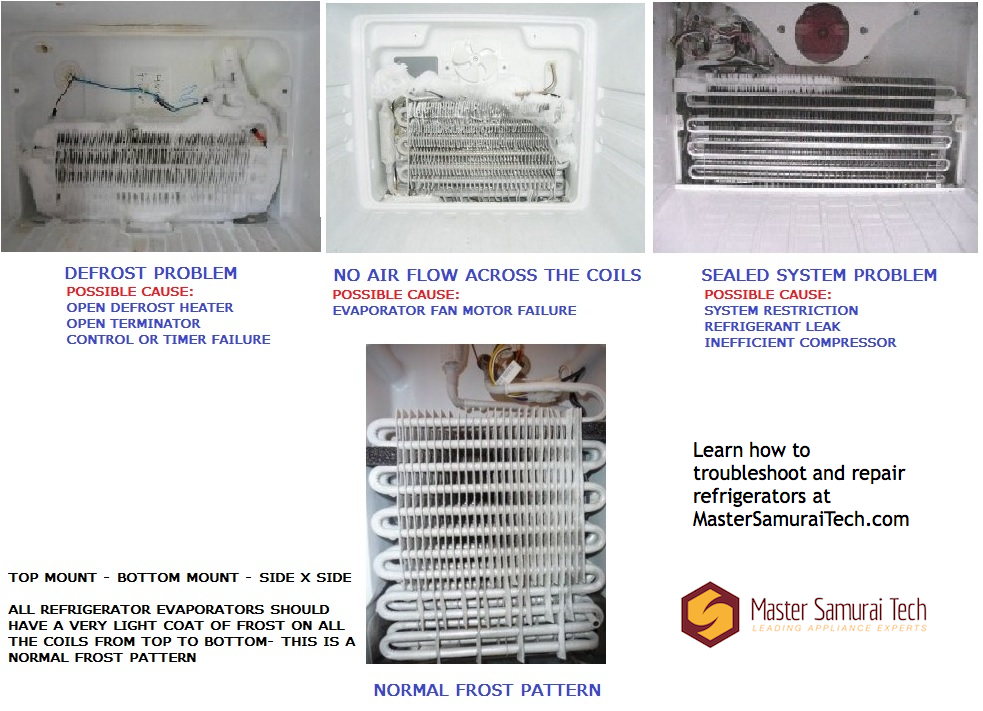
Remove the freezer’s back panel to inspect evaporator coil frost patterns. A light, even coating across all coils indicates proper refrigerant levels and system function. Partial frost coverage—frost limited to upper coils while lower sections remain clear—signals significant refrigerant loss, typically 80% or more of the system’s original capacity. This distinctive pattern is your strongest visual indicator of a refrigerant leak requiring professional attention.
How to Verify If You Have a Real Freezing Problem (Not Just Settings)
Before diving into complex repairs, confirm you’re dealing with an actual mechanical failure rather than simple user error or inaccurate temperature displays.
Perform the Thermostat Click Test
Turn the temperature control from its current setting to maximum and listen carefully for a distinct clicking sound. This click confirms the thermostat is sending power to the compressor circuit. Test at both extremes of the adjustment range—if you hear no click, the thermostat may have failed. Some thermostats fail intermittently, so repeated testing across multiple cycles provides more reliable results than a single test.
Check for Door Seal Failures with the Dollar Bill Test
Close a dollar bill in the door along the hinge side where seals typically fail first, then attempt to pull it out. Properly sealing doors hold the bill firmly enough that you feel resistance throughout its length. If the bill slides out easily, the seal has lost compression. Test multiple points around the entire door perimeter, as seal failure is often localized to specific sections. Damaged seals allow enough warm air infiltration to prevent freezing even when all mechanical components function perfectly.
Clear Hidden Ice Blockages in Air Channels Within 24 Hours
Many side-by-side and French door refrigerators develop invisible ice blockages in the air channel between compartments, gradually restricting airflow until cooling performance degrades significantly.
Locate and Defrost Hidden Air Channels
Unplug the appliance, remove all food, and leave freezer and refrigerator doors fully open for 24-48 hours to allow complete melting of hidden ice blockages. This hidden channel often fills with ice when the freezer door has been left ajar or in units with defrost system issues. After defrosting, wipe all interior surfaces dry before restarting the unit. If cooling performance returns, you’ve confirmed an airflow restriction issue rather than a refrigerant problem.
Prevent Future Ice Channel Blockages
Check door seals regularly for damage and ensure nothing blocks complete door closure. Items stored in door bins can prevent full closure, allowing humidity to enter and create ice buildup. Maintain at least one inch of clearance around all internal air vents and avoid overpacking the freezer compartment, which restricts air circulation necessary for proper freezing.
Clean Condenser Coils: The 15-Minute Fix You’re Probably Skipping

Dust, pet hair, and household debris coating condenser coils create an insulating barrier that reduces heat dissipation efficiency, forcing the entire system to work harder and reducing freezer cooling capacity.
Access and Clean Coils Properly
Unplug the refrigerator and locate coils (typically at the rear, bottom, or sides of the unit). Remove protective panels or grilles, then use a vacuum with a crevice attachment to remove loose debris. For heavy accumulation, use a coil cleaning brush to dislodge compacted material without damaging delicate fins. Work methodically along the entire coil surface, vacuuming as you go to capture dislodged debris. Replace all panels before restoring power.
Establish a Coil Cleaning Schedule
Clean condenser coils at least annually, or more frequently in homes with pets or dusty environments. Units in garages may require quarterly cleaning. Well-maintained coils extend compressor life, improve energy efficiency by up to 30%, and prevent the gradual cooling degradation that leads to freezing failures. Set calendar reminders to ensure you don’t skip this critical maintenance task.
Diagnose and Replace a Faulty Evaporator Fan in Your Freezer
The evaporator fan circulates cold air over the coils and throughout the freezer compartment. When this fan fails, coils may frost normally but the freezer cannot achieve uniform freezing temperatures.
Test Fan Operation Without Special Tools
Unplug the refrigerator and remove the freezer’s back panel to access the fan assembly. Manually spin the blade to check for binding, grinding, or resistance that indicates bearing wear. Listen for fan operation when the compressor cycles on—a complete absence of sound during compressor operation confirms fan failure. Some motors exhibit intermittent operation where they spin briefly when nudged but then stop, signaling impending complete failure.
Replace Failed Fans Step-by-Step
Note the wiring configuration before disconnecting (take photos for reference), then disconnect the old motor. Install the replacement fan by connecting wires to matching terminals and securing the motor housing. Test operation before reassembling the panel—proper fan replacement typically costs $80-150 for parts and takes under an hour for DIYers comfortable with basic appliance repair.
Test Defrost System Components Causing Ice Buildup on Coils

Frost-free freezers rely on automatic defrost systems to prevent ice accumulation on evaporator coils. When any component fails, ice builds up on coil surfaces, restricting airflow and preventing proper freezing.
Test the Defrost Heater with Basic Tools
Unplug the refrigerator and access the defrost heater terminals behind the evaporator coils. Set a multimeter to continuity mode and touch probes to the heater terminals. A functioning heater shows low resistance (20-50 ohms); infinite resistance indicates a broken element requiring replacement. Visually inspect for burn marks or physical damage to the glass tube housing.
Verify Defrost Thermostat Function
The thermostat, mounted directly on evaporator coils, should show continuity at room temperature but open the circuit when cooled below 38°F. Test by cooling the thermostat in ice water while monitoring continuity with a multimeter. A thermostat that fails to open when cold prevents proper defrost cycling; one that fails to close when warm prevents heater activation.
Identify Refrigerant Leaks: When to Repair vs. Replace Your Freezer
Low refrigerant charge represents one of the most serious causes of freezer coil freezing failure, with distinctive diagnostic indicators that separate it from other issues.
Recognize the Partial Frost Pattern
When evaporator coils show frost only on upper sections while lower portions remain clear, this confirms significant refrigerant loss—typically through a system leak. Unlike motor oil, refrigerant doesn’t wear out through normal use; it can only be lost through leaks at joint connections, corroded coils, or compressor shaft seals. Federal EPA regulations require licensed technicians for refrigerant handling, making DIY repair impossible.
Calculate Repair vs. Replacement Costs
Professional diagnosis and repair of refrigerant leaks typically costs $400-800. For units over eight years old, this investment often exceeds replacement cost of a new Energy Star-rated model. Even successful repairs provide uncertain longevity—once a sealed system develops a leak, other components may be nearing failure due to stress from operating with insufficient refrigerant. Consider replacement if repair costs exceed 50% of a new unit’s price.
Prevent Future Freezing Failures With Simple Monthly Maintenance
Implementing a consistent maintenance schedule prevents the gradual cooling degradation that leads to freezer coil freezing failures and extends appliance service life significantly.
Monthly Door Seal Inspection Routine
Examine all door gaskets for cracks, tears, or permanent deformation. Clean accumulated debris with mild soap and water, then apply a thin layer of petroleum jelly to maintain flexibility. Perform the dollar bill test monthly to catch seal degradation early. Properly maintained seals prevent warm air infiltration that forces the cooling system to work harder while gradually reducing freezing capacity.
Quarterly Air Filter Replacement
Locate and replace charcoal air filters every six months (or quarterly in households with multiple occupants or pets). A clogged filter can restrict airflow enough to prevent the freezer from reaching freezing temperatures while the refrigerator section maintains adequate cooling. Removing a saturated filter temporarily restores performance while you await a replacement—just don’t forget to install the new filter within 48 hours.
Summary of Key Diagnostic Indicators
| Symptom | Likely Cause | Immediate Action |
|---|---|---|
| Partial frost on coils, freezer warm | Refrigerant leak | Professional diagnosis; consider replacement |
| Ice in hidden air channels, refrigerator normal | Air channel blockage | Manual defrost; check door seal |
| Fan not running, ice on coil | Evaporator fan failure | Test and replace fan motor |
| Excessive frost buildup, inconsistent temperatures | Defrost system failure | Test heater, thermostat, and timer |
| Compressor runs constantly, no cooling | Refrigerant loss | Professional service required |
Freezer coil freezing failures range from simple maintenance oversights to complex sealed system issues. Start with basic checks—temperature settings, door seals, airflow obstructions, and coil cleanliness—before progressing to electrical component testing. For units showing partial frost patterns on coils, professional diagnosis is essential as refrigerant leaks require EPA-certified handling. Implement monthly maintenance routines including door seal inspections and annual coil cleaning to prevent future freezing failures and extend your appliance’s service life significantly. When repair costs exceed half the price of a new unit, replacement often makes better economic sense than attempting to fix aging sealed systems.