How to Fix Freon Leak in Freezer
Your freezer suddenly stops freezing properly, leaving ice cream soft and meat partially thawed. Food spoils faster than usual, and your electricity bill mysteriously increases. These frustrating symptoms often point to a freon leak in freezer systems—a serious issue requiring immediate attention. When refrigerant escapes from the sealed cooling system, your appliance loses its ability to maintain sub-zero temperatures, threatening your frozen food investment and potentially damaging the compressor through continuous overwork. Understanding how to identify, diagnose, and address a freon leak can save you hundreds in food replacement costs and prevent further appliance damage.
This guide provides actionable steps to determine if you’re dealing with a refrigerant leak, helps you evaluate repair versus replacement options, and shows you how to prevent future freon leaks in your freezer. Whether you’re troubleshooting current cooling problems or want to safeguard your appliance against refrigerant loss, this information will help you make informed decisions about your freezer’s health.
Why Freezer Evaporator Coils Develop Freon Leaks
Freon leaks in freezer systems most often originate from the evaporator coils, where refrigerant absorbs heat from the interior compartment. These leaks develop primarily through three mechanisms that compromise the integrity of the sealed refrigeration system.
Material fatigue from thermal cycling causes microscopic cracks in copper and aluminum components over time. As your freezer compressor cycles on and off, the refrigerant tubing expands when warm and contracts when cold—repeating this process thousands of times annually. This constant stress eventually creates tiny fractures at connection points, brazed joints, and along coil sections. Aluminum evaporator coils, increasingly common in modern freezers, are particularly vulnerable to this type of failure due to aluminum’s lower fatigue resistance compared to copper.
Physical impact damage creates immediate or delayed refrigerant loss. When moving your freezer, even minor bumps can dent or puncture the thin evaporator tubing hidden behind interior panels. The compressor vibration during normal operation also causes refrigerant lines to rub against cabinet components, gradually wearing through protective insulation and eventually the metal tubing itself. If you’ve recently relocated your freezer or heard unusual rattling noises, physical damage likely caused your freon leak in freezer system.
Corrosion from environmental exposure eats through metal components over time. Moisture, cleaning chemicals, or airborne contaminants attack copper and aluminum tubing, creating pinhole leaks that slowly deplete refrigerant. Galvanic corrosion occurs when dissimilar metals contact each other in humid environments—common in garage or basement freezers where humidity fluctuates. Check for greenish patina on copper lines or white powdery deposits on aluminum coils, which indicate active corrosion compromising your refrigeration system.
How to Confirm a Freon Leak in Your Freezer
Identifying a freon leak requires observing specific symptoms beyond general cooling problems, as other issues like failed thermostats or defrost systems can mimic refrigerant loss.
Temperature monitoring reveals gradual performance decline:
– Place a reliable thermometer in the center of your freezer
– Record temperatures at the same time daily for 3-5 days
– Note if temperatures consistently rise above -18°C (0°F)
– Document compressor runtime patterns (should cycle on/off normally)
Physical evidence confirms refrigerant escape:
– Check for oily residue around compressor and tubing connections—this greasy film indicates refrigerant carrying compressor oil through the leak
– Look for unusual frost patterns: uneven frost only on certain coil sections or excessive frost that defrost cycles can’t manage
– Feel if the freezer exterior is warmer than normal, particularly near condenser coils
– Listen for hissing sounds indicating rapid refrigerant escape
Economic indicators signal developing problems:
– Track your electricity usage—freon leaks cause 25-50% higher energy consumption as the compressor runs continuously
– Note if food spoils faster despite seemingly normal operation
– Compare current performance to historical freezer behavior (how long ice cream stays solid)
Professional Leak Detection Methods That Actually Work
While you can identify symptoms, accurately locating a freon leak in freezer systems requires professional tools and expertise. Certified technicians use three reliable methods that homeowners can’t effectively replicate.
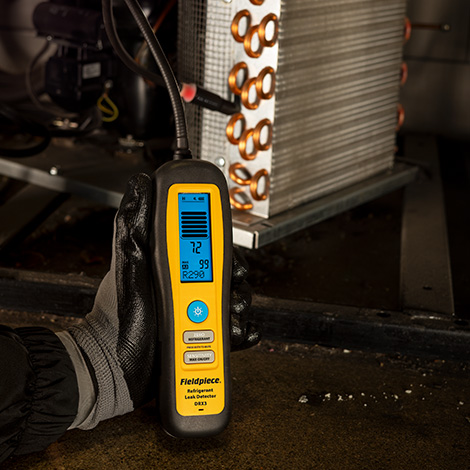
Electronic leak detectors pinpoint even slow leaks by sensing refrigerant molecules in the air. These handheld devices emit audible alerts that intensify as they approach the leak source. Modern detectors identify leaks as small as 0.5 ounces per year—critical for catching developing problems before they cause major damage. Technicians methodically scan all connections, joints, and accessible tubing sections, moving slowly to avoid missing subtle leaks.
UV dye injection provides permanent leak tracking by adding fluorescent dye to the refrigerant system. After operating for 24-48 hours, any escaping refrigerant carries the dye to the leak site, which glows bright yellow-green under UV light. This method remains effective for months, helping identify intermittent leaks that might not be apparent during initial diagnosis. The dye doesn’t affect system performance and requires no removal after leak repair.
Nitrogen pressure testing verifies system integrity by replacing refrigerant with dry nitrogen gas. Technicians pressurize the system to 200-300 psi and monitor pressure for 24-48 hours. A consistent pressure drop confirms a leak, while stable pressure indicates other issues. This test isolates the refrigeration circuit from operational variables, providing definitive proof of leaks that soap bubble testing might miss.
Repair vs. Replace: Making the Right Decision

When facing a confirmed freon leak, the critical question becomes whether to repair or replace your freezer—a decision based on four key factors.
Leak location determines repair feasibility:
– Connection point leaks (valve cores, service ports): $150-$400 repair
– Evaporator coil leaks (hidden behind interior walls): $500-$1,000+ repair
– Compressor housing leaks: $300-$600 repair
Appliance age affects cost-benefit analysis:
– Freezers under 5 years: Usually worth repairing
– Freezers 5-10 years: Evaluate repair cost vs. 50% replacement value
– Freezers over 10 years: Replacement typically more economical
Environmental regulations impact repair costs:
– R-22 refrigerant systems (pre-2010): Repair costs skyrocketing due to banned production
– R-134a systems: Moderate repair costs but declining parts availability
– R-600a (isobutane) systems: Most cost-effective repairs due to newer technology
If repair costs exceed 50% of a comparable new Energy Star model’s price, replacement becomes the smarter choice—especially considering new freezers use 10-25% less electricity. The environmental benefit of newer refrigerants with lower global warming potential provides additional justification for upgrading.
Preventing Future Freon Leaks Through Proper Maintenance
You can significantly extend your freezer’s life and prevent refrigerant leaks with three proactive measures that address the primary causes of system failure.
Optimize freezer placement to reduce stress:
– Ensure 1-2 inches of clearance around sides and back for proper ventilation
– Place on a level surface to prevent door seal strain and internal component stress
– Avoid locations with temperature extremes (unheated garages in winter)
– Keep away from physical impact zones where bumping might damage refrigerant lines
Implement regular maintenance routines:
– Clean condenser coils twice yearly using a soft brush or vacuum attachment
– Inspect door gaskets monthly for cracks, tears, or loss of elasticity
– Replace worn seals immediately—don’t wait for obvious air leakage
– Keep interior defrosted (for manual-defrost models) to prevent evaporator strain
Monitor performance indicators:
– Maintain a temperature log to catch gradual performance decline
– Note changes in compressor cycling patterns (should run 40-60% of the time)
– Watch for unusual noises, excessive frost, or oil stains around components
– Address minor issues immediately before they escalate into major failures
When to Immediately Call a Professional Technician
Certain situations require prompt professional intervention rather than DIY investigation or delayed action.
Call a certified technician immediately if:
– Your freezer fails to maintain any freezing temperature below 0°F
– You notice significant oil staining around compressor or tubing connections
– Hissing sounds indicate rapid refrigerant escape
– Energy consumption increases more than 25% without explanation
– Frost patterns appear only on specific coil sections
Never attempt refrigerant work yourself—EPA regulations require certification for handling refrigerants, and improper techniques can:
– Cause personal injury from high-pressure components
– Introduce moisture or contaminants that destroy the system
– Void any remaining manufacturer warranty
– Result in environmental violations with significant fines
Choose technicians with current EPA Section 608 certification and request written estimates that break down diagnosis, repair, and refrigerant costs separately. Verify they use proper recovery equipment and follow environmental regulations for refrigerant handling.
Critical Safety Steps Before Freezer Repair
Before any service technician arrives, take these essential safety precautions to protect yourself, your food, and the appliance.
Secure food inventory first:
– Transfer perishables to a cooler with ice packs
– Discard any food that has been above 40°F for more than 2 hours
– Label and organize items for quick transfer back after repair
Prepare the appliance for service:
– Unplug the freezer at least 30 minutes before technician arrival
– Remove all contents and interior components
– Clear a 3-foot working area around the appliance
– Ensure adequate lighting at the service location
Verify technician credentials:
– Confirm EPA 608 certification before allowing work
– Ask about warranty coverage for parts and labor
– Request documentation of recovered refrigerant amounts
– Ensure they’ll test system performance before leaving
Final Takeaways for Managing Freon Leaks
A freon leak in freezer systems demands prompt, informed action to protect your food, wallet, and appliance investment. Key warning signs like rising temperatures, oily residue, and increased energy consumption often precede complete failure, giving you time to address the issue before food spoils. Professional leak detection methods—electronic sensors, UV dye, and pressure testing—accurately locate breaches that DIY methods miss.
When deciding between repair and replacement, consider leak location, appliance age, and environmental regulations affecting refrigerant availability. For most freezers over seven years old with evaporator coil leaks, replacement proves more economical than repair. Proper installation, regular maintenance, and performance monitoring significantly reduce your risk of future refrigerant leaks.
Remember that attempting refrigerant repairs without certification violates environmental regulations and risks personal injury. Always work with EPA-certified technicians who follow proper recovery procedures. By understanding these critical aspects of freon leaks in freezers, you’ll make smarter decisions that protect your food, save money, and ensure your appliance operates efficiently for years to come.