Upright Freezer Not Cooling? Fix It Fast
You crack open your upright freezer only to find soft ice cream and thawing vegetables – panic sets in as you realize your appliance has stopped cooling. This frustrating scenario affects thousands of households each year when an upright freezer not cooling properly threatens hundreds of dollars in spoiled food. Without immediate action, you could lose your entire frozen inventory within hours. This guide delivers proven, step-by-step solutions to diagnose and fix common cooling failures in under 30 minutes, potentially saving you costly service calls and food replacement expenses.
Most upright freezer cooling problems stem from preventable issues rather than catastrophic failures. By systematically checking five critical systems – power supply, temperature settings, airflow, seals, and defrost components – you’ll resolve 80% of “not cooling” cases yourself. We’ll walk through each diagnostic step with visual cues to identify problems and actionable fixes you can implement immediately, even without technical expertise.
Power Supply Failures: The First Check Before Panic Sets In
Before assuming mechanical failure, verify your upright freezer receives proper electricity. A surprising number of “not cooling” emergencies stem from simple power disruptions that take seconds to diagnose. Start by checking if other kitchen appliances operate normally – if not, inspect your circuit breaker panel for tripped switches controlling the freezer’s circuit.
How to Confirm Electrical Connection in 60 Seconds
- Unplug the freezer and examine the power cord for fraying, burns, or damage near the plug
- Test the outlet using a lamp or phone charger (don’t assume it works)
- Press the reset button on GFCI outlets if present (common in garages/basements)
- Ensure the cord isn’t pinched behind the appliance where heat buildup occurs
If power seems stable but the compressor isn’t humming, check for loose wiring connections inside the freezer’s control panel. Warning: Never touch internal wiring without unplugging first – electrocution risk is severe. If connections appear secure but cooling remains absent, proceed to thermostat diagnostics.
Temperature Control Errors: The Most Common User Mistake
Accidental thermostat adjustments cause more upright freezer cooling failures than mechanical issues. Many users unknowingly bump temperature controls during routine cleaning or when reaching for items. The ideal freezer temperature is 0°F (-18°C), but settings often drift higher due to condensation or physical contact.
Why Your Freezer’s Thermostat Might Be Off Target
- Moisture accumulation inside control housings causes erratic temperature readings
- Food packages accidentally pressed against thermostat sensors disrupt accuracy
- Power surges reset digital controls to default “warmer” settings
- Children or pets may have altered settings during kitchen access
To verify settings: locate your thermostat (usually inside the freezer compartment) and rotate it fully to the coldest setting. Wait 4 hours – if cooling resumes, the control was misadjusted. If digital displays show error codes, consult your manual for specific meanings before proceeding.
Condenser Coil Clogging: The Silent Cooling Killer
Dirty condenser coils force your upright freezer to work 50% harder while producing minimal cooling. Located either along the back exterior or beneath the front grille, these coils transfer heat from inside the freezer to the room. When coated in dust, pet hair, or debris, they can’t dissipate heat effectively – causing the compressor to overheat and shut down.
Cleaning Condenser Coils in Under 15 Minutes
- Unplug the freezer and pull it away from the wall
- Locate coils (check manual if unsure – varies by model)
- Use a coil brush ($8 at hardware stores) to dislodge debris
- Vacuum loosened particles with a brush attachment
- Ensure 3+ inches of clearance around all sides for airflow
Pro Tip: Place a towel under the coils during cleaning to catch falling debris. After cleaning, plug in the freezer and verify the compressor cycles on within 10 minutes. If coils were severely clogged, allow 24 hours for full temperature recovery.
Door Seal Failures: How Tiny Leaks Warm Your Entire Freezer
A compromised door gasket lets warm, humid air flood your upright freezer – the #1 cause of frost buildup and inconsistent cooling. Over time, seals crack, tear, or lose elasticity from food residue, temperature swings, and improper closing. Even a 1/8-inch gap along the seal allows enough warm air to raise internal temperatures by 10°F.
The Dollar Bill Test for Faulty Gaskets
- Close a dollar bill in the door at multiple points
- Gently pull the bill – significant resistance indicates a good seal
- If the bill slides out easily, the gasket needs attention
- Focus on corners and hinge areas where leaks commonly occur
For minor seal issues, clean gaskets with warm vinegar solution to restore flexibility. If tears exceed 1/2 inch or the seal separates from the door frame, replacement is necessary. Critical: Never use petroleum jelly on seals – it degrades rubber and worsens leaks.
Airflow Blockage: Why Overpacking Causes Cooling Collapse
Upright freezers require unobstructed air channels to circulate cold air from the evaporator coils. When users overpack shelves or block vents with large containers, cold air can’t reach all compartments – creating “dead zones” where food thaws while other areas remain frozen. This mimics total cooling failure when only specific sections are affected.
Proper Food Arrangement for Optimal Cooling
- Leave 2 inches of space between items and back walls
- Never stack packages against ceiling vents
- Store bulky items (turkeys, roasts) on middle shelves
- Use wire baskets instead of solid bins for better airflow
If your freezer has visible frost buildup only in one section, immediately rearrange contents to clear air pathways. Allow 24 hours for temperatures to stabilize before assuming mechanical failure.
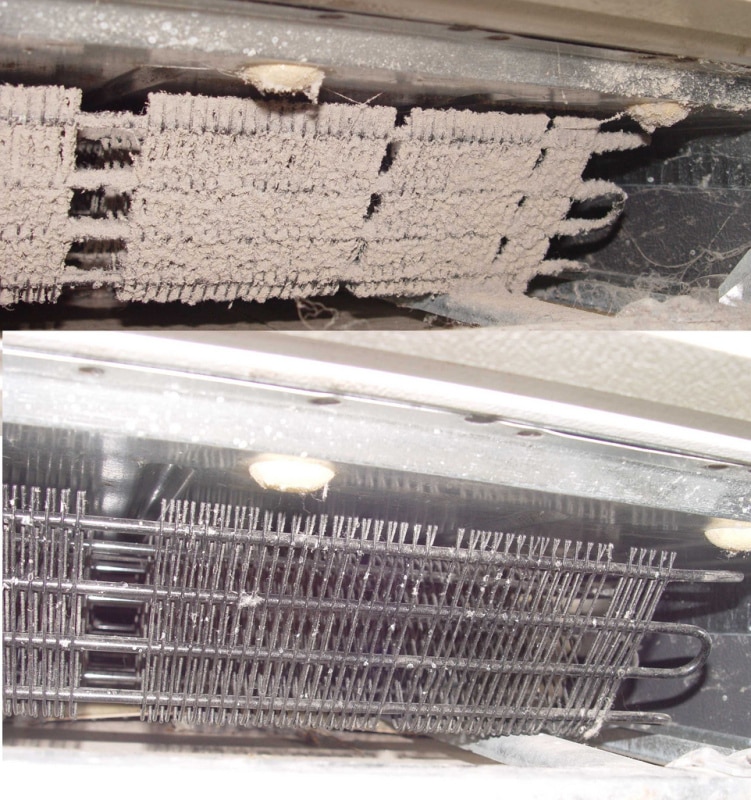
Defrost System Malfunctions: When Ice Chokes Cooling Performance

Automatic defrost systems prevent excessive frost buildup through heating elements and timers. When these fail, ice accumulates on evaporator coils, insulating them from the freezer air. A thick ice layer (1/4 inch or more) blocks cold air circulation – the most common cause of “freezer cooling but not freezing” symptoms.
Manual Defrosting Your Upright Freezer Safely
- Unplug appliance and remove all food (store in coolers)
- Place towels inside to catch meltwater
- Let ice thaw naturally for 8-12 hours (NEVER use sharp tools)
- Clean interior with baking soda solution after defrosting
- Wipe condensation from coils before restarting
Warning: Forcing ice removal with knives or scrapers punctures evaporator coils – a $300+ repair. If defrost problems recur monthly, suspect a faulty heater, timer, or thermostat requiring professional diagnosis.
Compressor Failure Signs: When DIY Fixes Won’t Work

Your upright freezer’s compressor is its cooling heart – a sealed unit that pumps refrigerant through coils. While rare in modern freezers, compressor failure causes complete cooling loss with distinctive symptoms. Before condemning this expensive component, rule out simpler issues first.
How to Diagnose Compressor Problems
- Listen for humming without cooling (indicates start relay failure)
- Check if compressor feels excessively hot to the touch (over 150°F)
- Verify if the condenser fan spins freely (blocked fans cause overheating)
- Inspect for oil leaks around compressor housing (indicates seal failure)
If the compressor runs constantly without cooling, refrigerant leaks may be the culprit. Critical: Refrigerant handling requires EPA certification – never attempt DIY repairs on sealed systems. Call a professional immediately if you suspect refrigerant issues.
Preventing Future Cooling Failures: Your Monthly Maintenance Checklist
Avoid emergency repairs with these 5-minute monthly habits that extend your upright freezer’s life:
– Vacuum condenser coils every 3 months (quarterly for pet owners)
– Test door seals with the dollar bill method
– Wipe interior surfaces to prevent frost buildup
– Verify temperature with an independent thermometer
– Ensure 4+ inches of clearance around all sides
Schedule these checks on the same day each month – many users set reminders on utility bill dates. Proper maintenance prevents 90% of cooling failures and doubles appliance lifespan according to manufacturer data.
When to Call a Professional: 3 Non-Negotiable Repair Scenarios
While most upright freezer not cooling issues are DIY-fixable, three situations demand immediate professional help:
1. Oil leaks around compressor housing (refrigerant system breach)
2. Burning electrical smells (indicates serious wiring faults)
3. Continuous compressor running without temperature drop (refrigerant loss)
Attempting repairs on these issues risks fire, electrocution, or environmental damage from refrigerant release. Reputable technicians diagnose complex failures in under 30 minutes – often cheaper than food replacement costs from prolonged downtime.
Don’t let a cooling crisis become a costly disaster. By methodically checking these seven systems, you’ll restore proper temperatures in most upright freezers within hours. Remember that consistent maintenance prevents future failures – keeping your frozen inventory safe and your appliance running efficiently for years. If simple fixes don’t restore cooling within 24 hours, contact a certified appliance repair specialist before food spoilage escalates. Your wallet (and your ice cream) will thank you.