How to Freeze Apples: Easy Prep Guide
Nothing beats biting into a crisp, fresh apple during harvest season—but what if you could enjoy that same quality year-round? Knowing how to prepare apples for freezer storage lets you capture peak-season flavor while reducing waste and saving money. Whether you’ve scored a great deal at the store, harvested from your backyard tree, or visited a local orchard, freezing apples properly locks in their natural sweetness and nutrients for months to come. This guide reveals exactly how to prepare apples for freezer storage without sacrificing quality, so you’ll always have perfectly preserved fruit ready for pies, smoothies, or snacking.
The freezing process actually preserves more nutritional value than fresh apples that have traveled long distances—when done correctly. With the right techniques, your frozen apples maintain excellent quality for six to eight months (or up to a year!), making them a powerhouse pantry staple. Let’s dive into the exact steps you need to follow.
Select Apples That Freeze Like a Pro
Golden Delicious and Granny Smith varieties dominate the freezing scene for good reason—they maintain structure better than softer types when frozen and thawed. Golden Delicious offers that perfect balance of sweetness and firmness that holds up beautifully in baked goods, while Granny Smith’s tartness and dense flesh make it ideal for cooking applications where you want pronounced apple flavor without mushiness.
Honeycrisp and Fuji apples also freeze well but serve different purposes—Honeycrisp delivers exceptional juiciness perfect for smoothies, while Fuji’s natural sweetness works wonders in applesauce. Avoid McIntosh and Red Delicious for freezing; their delicate cell structure breaks down completely, resulting in unappetizing mush after thawing.
Pro Tip: Choose firm, unblemished apples at peak ripeness—not overripe. Inspect each one carefully, as even small bruises accelerate spoilage during storage. Apples harvested at their sugar peak deliver the best flavor after freezing.
Gather These Essential Freezing Tools
You don’t need fancy equipment, but having the right tools makes how to prepare apples for freezer storage faster and more effective. Start with a sharp stainless steel knife (not carbon steel, which accelerates browning) or mandoline slicer for uniform cuts that freeze evenly. A sturdy cutting board dedicated to fruit prevents cross-contamination.
For anti-browning protection, keep lemon juice or ascorbic acid (vitamin C powder) on hand—both prevent oxidation without compromising flavor. Resealable freezer bags or vacuum sealer bags form your first defense against freezer burn, while rigid freezer containers work better for purees or chunky applications.
Critical Warning: Never use regular plastic bags—they’re not thick enough to prevent air exposure and will result in freezer-burned apples within weeks. Invest in proper freezer-safe packaging for best results.
Wash, Peel, and Slice Apples Properly
Begin by washing apples thoroughly under cool running water to remove dirt and residues. For conventional apples, use a baking soda solution (1 tbsp per cup of water), then rinse well. Gently rub the skin to remove waxy coatings—this step prevents contaminants from transferring to your flesh during cutting.
Decide whether to peel based on your intended use:
– Peel for pies, sauces, or smooth applications
– Keep skin on for cooked dishes where texture softens (saves time and preserves nutrients)
Core apples using a handheld corer or knife, then slice to your desired thickness:
– 1/8-1/4 inch: Best for snacking or quick-thaw applications
– 1/4-1/2 inch: Ideal for pies and baking
– 1/2-1 inch: Perfect for crisps and cobblers
Expert Note: Work quickly after cutting—exposure to air starts the browning process immediately. Prepare anti-browning solution in advance so you can treat slices as soon as they’re cut.
Stop Browning Before Freezing (3 Effective Methods)

Lemon Juice Soak Method
Mix 1 tablespoon fresh lemon juice per cup of water. Submerge apple slices for 2-5 minutes, then drain thoroughly. This natural method prevents browning without overpowering flavor—perfect for sweet varieties like Golden Delicious. Warning: Don’t soak longer than 5 minutes or texture suffers.
Ascorbic Acid Treatment
Dissolve 1 teaspoon ascorbic acid powder in 3 tablespoons water (treats about 1 gallon of apples). Sprinkle over slices or dip briefly. This commercial-freezer secret works better than lemon juice for long-term storage and adds no flavor—ideal for tart varieties like Granny Smith.
Quick Salt Water Alternative
For those avoiding citrus, mix ½ teaspoon salt per cup of water. Soak apples 1-2 minutes, then rinse thoroughly. While effective, this method requires careful rinsing to avoid salty-tasting apples.
Pro Tip: Always drain treated apples completely on clean towels—excess moisture creates ice crystals that damage texture during freezing.
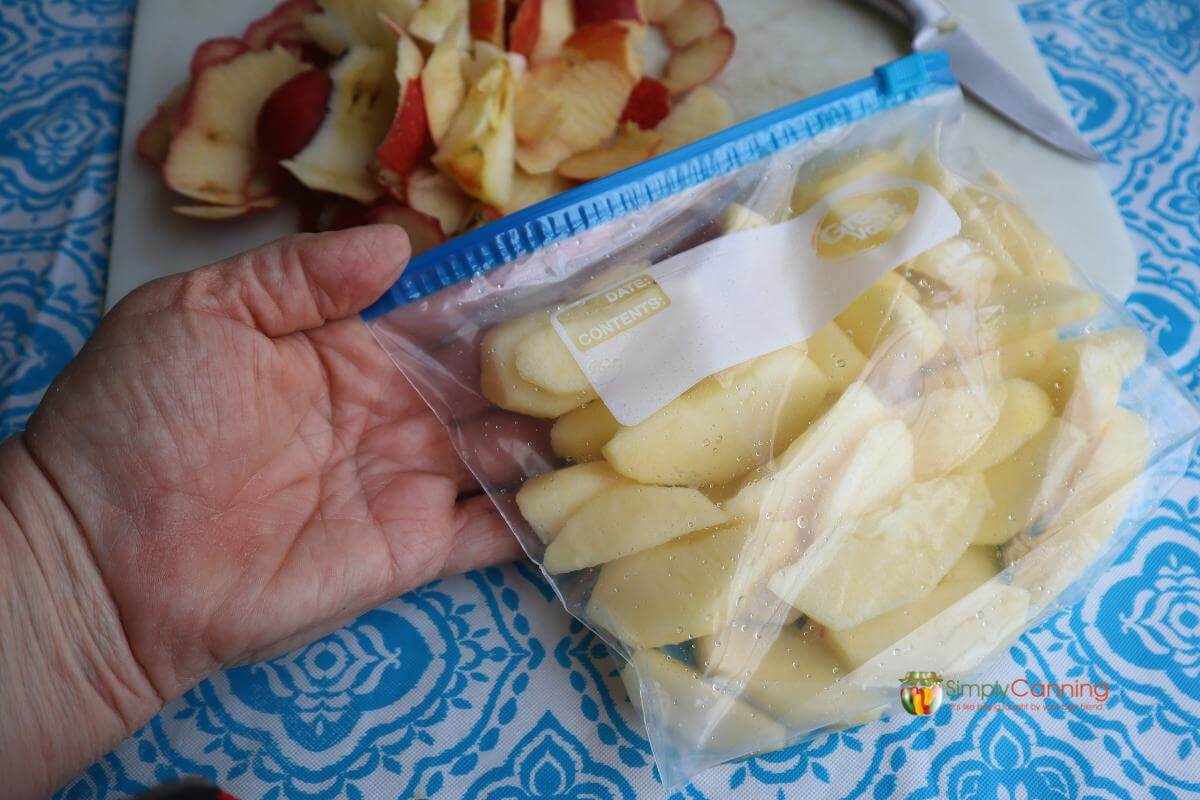
Package Apples for Maximum Freshness
Proper packaging determines whether your apples last six months or six weeks. Fill freezer bags only ¾ full to allow for expansion, then press out ALL air before sealing. Use the water displacement method: submerge the nearly-sealed bag in water to force air out before closing completely.
Vacuum sealing beats regular bags by removing 99% of air—extend storage life to 12 months with this method. Arrange apples in single layers for faster freezing and easier portioning later. Never skip labeling—mark bags with apple variety and date using freezer-safe marker.
Critical Mistake to Avoid: Overpacking bags prevents proper sealing and causes freezer burn. Leave 1-2 inches of headspace for expansion, and freeze packages flat for easiest stacking and storage.
Freeze Correctly & Store Smartly
Place packaged apples in your freezer’s coldest spot—typically the back of the bottom shelf, not the door where temperatures fluctuate. Set freezer to 0°F (-18°C) or lower; use an appliance thermometer to verify accuracy.
Storage Timeline:
– 0-3 months: Excellent quality, nearly fresh in cooked dishes
– 3-6 months: Very good quality, minor texture changes
– 6-8 months: Good quality, best for baking/cooking
– 8-12 months: Acceptable for smoothies/sauces only
Pro Tip: Rotate stock using the “first in, first out” method—place new packages behind older ones so you use the oldest apples first.
Thaw Frozen Apples Without Ruining Texture
Thaw apples safely in the refrigerator overnight for best texture—this slow process preserves cell structure. For faster thawing, place sealed bags in cold water, changing water every 30 minutes (takes 1-2 hours).
Game-Changing Shortcut: Use frozen apples directly in baking—add 5-10 minutes to cooking time since frozen fruit releases more liquid. Frozen slices work perfectly in pies, crisps, and muffins without pre-thawing.
Critical Warning: Never thaw apples at room temperature for more than 2 hours—this promotes bacterial growth. Discard any apples left out longer than this safety window.
Fix Common Freezing Problems Immediately
Freezer burn appears as dry, leathery patches caused by air exposure. Prevent it by removing ALL air during packaging and maintaining consistent freezer temperature. Trim affected areas before using—burned portions are safe but taste stale.
Excess moisture after thawing means inadequate draining before freezing. Press treated slices between towels to remove surface water, and use vacuum sealing for best moisture control.
Discoloration indicates incomplete anti-browning treatment. Ensure full submersion in solution and work in small batches for even coverage.
Mushy texture is unavoidable to some degree—minimize it by choosing firm varieties, working quickly during prep, and freezing at the lowest possible temperature.
Mastering how to prepare apples for freezer storage transforms seasonal abundance into year-round convenience without sacrificing quality. The key lies in selecting the right varieties, preventing browning effectively, removing ALL air during packaging, and maintaining consistent freezer temperatures. Whether you’re preserving a backyard harvest or capitalizing on grocery sales, properly frozen apples deliver exceptional flavor and texture for baking, cooking, and snacking months later.
Final Pro Tips: Freeze apples in recipe-sized portions (2 cups for pies, 1 cup for smoothies), always label with dates, and use older batches first. With these techniques, your frozen apples maintain peak quality for 6-8 months—making “how to prepare apples for freezer” one of the most valuable kitchen skills you’ll ever learn. Start freezing today and enjoy farm-fresh flavor in every apple-based dish, no matter the season.