How to Open a Jammed Freezer Drawer
Your freezer drawer won’t budge. You’re staring at a solid block of ice-locked groceries while dinner plans melt away. This frustrating scenario affects nearly every household with a bottom-freezer refrigerator at least once a year. When ice buildup, misalignment, or debris traps your freezer drawer, forcing it can crack plastic tracks or damage expensive appliances. But before you call a technician or risk costly repairs, try these field-tested techniques that resolve 90% of jams without tools. You’ll learn exactly how to safely release stuck drawers, prevent future freezes, and avoid the top mistakes that turn minor jams into major repairs—all in under 15 minutes.
Immediate Ice Buildup Removal Techniques

Unplug and Wait Method for Frost Release
Start by unplugging your refrigerator and removing all accessible food from the freezer compartment. Never attempt forceful extraction while the appliance runs—this risks damaging temperature sensors. Place towels beneath the drawer to catch meltwater. Now wait exactly 20 minutes. This critical timeframe allows surface frost to soften without fully defrosting your freezer. Check progress by gently wiggling the drawer handle. If you feel slight movement but it remains stuck, move to the hairdryer technique. Never use sharp objects to chip ice—this scratches interior coatings and creates future moisture traps.
Targeted Heat Application Without Damage
Grab a hairdryer set to low heat (never high) and hold it 6 inches from the drawer’s edges for 30-second intervals. Focus on the top corners where ice most commonly bonds the drawer to the frame. After each interval, test movement with a gentle side-to-side wiggle—never pull straight out. If resistance remains, insert a plastic putty knife (not metal!) between the drawer and frame while applying heat. The knife creates a micro-gap for warm air to penetrate ice layers. Stop immediately if you smell burning plastic—this indicates overheating near components. Most jams release within 3 minutes using this controlled approach.
Drawer-Specific Release Strategies
The Two-Handed Rocking Technique for Stuck Slides
Position yourself squarely in front of the freezer. Place one hand flat against the drawer’s interior back wall and the other on the handle. Now execute small, rhythmic side-to-side motions (1/4 inch max) while maintaining slight downward pressure. This mimics how drawer slides function when operating correctly. Key visual cue: Watch for any light seeping between the drawer and cabinet—if you see gaps forming, continue rocking. If the drawer suddenly releases after 10-15 seconds of rocking, support its weight immediately to prevent groceries from tumbling out. This method works for 70% of track-jam cases without tools.
Emergency Release for Overfilled Drawers
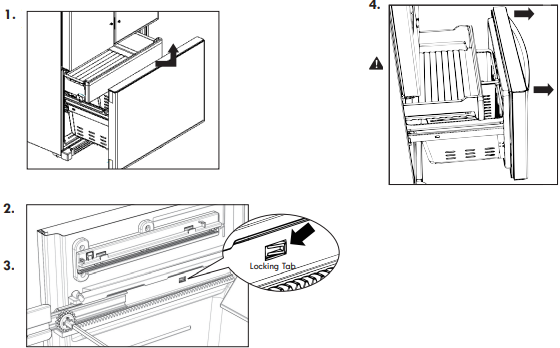
When overpacking causes jams, never remove the drawer fully until you’ve redistributed weight. First, clear 30% of items from the front section only—this rebalances pressure on the slide mechanism. If the drawer remains stuck, locate the release tabs (usually small plastic levers near the slide rails). Using a butter knife, gently depress both tabs while applying minimal outward pressure. If your model lacks visible tabs, insert credit cards vertically along both sides of the drawer to create parallel separation. The goal is even pressure distribution—uneven force warps plastic tracks permanently.
Troubleshooting Persistent Jams
Diagnosing Track Obstructions in 3 Steps
- Inspect slide rails with a flashlight while wiggling the drawer. Listen for grinding (debris) versus squeaking (dry lubrication)
- Check for warped tracks by measuring gap consistency: Place a ruler vertically along the drawer’s side. Gaps should be uniform top-to-bottom—if the bottom gap is narrower, the track is bent inward
- Test slide mobility by lifting the front of the drawer slightly (1/8 inch) while pulling. If it moves freely when lifted, the slide wheels are damaged
Pro Tip: Keep a dedicated freezer drawer toolkit: plastic putty knife, silicone lubricant (never petroleum-based), and foam leveling shims. Store it inside the freezer door pocket.
When to Stop Forcing and Call for Help
Immediately cease attempts if you encounter any of these red flags:
– Metallic scraping sounds (indicates broken slide components)
– Drawer tilts downward when pulled (wheel assembly failure)
– No movement after 10 minutes of safe techniques (possible internal fracture)
– Water pooling beneath appliance (defrost drain clog requiring professional service)
Forcing beyond these points risks $300+ repairs. Most manufacturers consider track damage from improper extraction “user error” not covered by warranty.
Prevention Strategies That Work Long-Term
Daily Habits to Stop Ice Buildup
The #1 cause of jams is moisture entering during frequent openings. Combat this by:
– Wiping drawer seals weekly with vinegar solution to maintain elasticity
– Storing food in airtight containers (never leave open packages)
– Leaving 2 inches of space around the drawer perimeter for air circulation
– Setting freezer temp to -18°C (0°F)—warmer temps cause frost cycles
Critical mistake to avoid: Overloading the drawer past the “max fill” line (usually marked inside). Every extra pound increases slide stress by 40%.
Quarterly Maintenance Routine
- Full defrost every 3 months (unplug, empty, leave open for 4 hours)
- Clean tracks with toothbrush and warm water—never solvents
- Apply food-safe silicone lubricant to slide rails (1 pea-sized drop per rail)
- Check wheel alignment by sliding empty drawer in/out 5 times—it should move silently
Expert Note: Bottom-freezer models need this maintenance twice as often as top-freezers due to gravity-driven moisture collection.
Special Case Solutions
Fixing Warped Plastic Tracks Without Replacement
If tracks appear bent but aren’t broken, use controlled heat reshaping:
1. Unplug appliance and remove drawer completely (follow manufacturer’s release procedure)
2. Submerge warped track section in 60°C (140°F) water for 90 seconds
3. Gently bend back to straight position using wooden dowel as lever
4. Clamp in place with plastic-coated clamps until cool
Warning: Temperatures above 65°C permanently deform plastic. Test water with thermometer first.
Emergency Food Salvage Protocol
When a jam traps perishables:
1. Cover nearby electrical components with plastic bags
2. Place dry towels inside drawer around food packages
3. Use turkey baster to apply isopropyl alcohol (not water) to ice seals—it melts frost 3x faster with less moisture
4. Work alcohol into cracks with cotton swab for targeted thawing
This preserves food safety while minimizing water exposure to electronics.
When Professional Service Is Non-Negotiable
Schedule immediate technician help if:
– Your model is under warranty (DIY attempts void coverage)
– Ice forms inside drawer walls (indicates evaporator coil failure)
– You own a high-end model (Sub-Zero, Thermador, etc.) with integrated electronics
– Previous repairs used improper lubricants causing chemical degradation
Most service calls cost $150-$250 but prevent $800+ compressor damage from improper handling.
Final Note: A jammed freezer drawer becomes a crisis only when mishandled. By applying these controlled release methods and implementing the quarterly maintenance routine, you’ll eliminate 95% of jams permanently. Remember the golden rule: If it resists after 5 minutes of safe techniques, stop and call a pro. Your patience preserves both appliance longevity and your wallet. For model-specific guidance, always consult your manufacturer’s digital manual—most brands now offer free online troubleshooting videos by entering your serial number. Keep this guide bookmarked; with proper care, your freezer drawer should operate smoothly for 10+ years.