How to Fix a Sagging Freezer Door
Is your freezer door drooping noticeably when opened? That annoying sag isn’t just an eyesore—it’s a serious problem that can cause frost buildup, higher energy bills, and even food spoilage. When your freezer door loses its proper alignment, the rubber gasket can’t seal correctly, allowing cold air to escape and warm, moist air to enter your appliance. Many homeowners waste hundreds of dollars on unnecessary service calls when this common issue can often be fixed in under 30 minutes with basic tools. In this guide, you’ll learn exactly how to diagnose and fix a sagging freezer door yourself, saving time and money while extending your appliance’s lifespan.
Identifying the Cause of Your Freezer Door Sag
Before attempting any repairs, you need to determine why your freezer door is sagging. The most common culprits include worn hinges, misaligned door components, or damaged mounting hardware. Each cause requires a different solution, so proper diagnosis is crucial to avoid wasting time on ineffective fixes.
Checking for Worn or Damaged Hinges
Worn hinges represent the most frequent cause of freezer door sagging. To check your hinges:
- Open your freezer door fully and observe if it drifts closed or hangs at an angle
- Lift the door gently upward while it’s open—if there’s noticeable play, your hinges are likely worn
- Inspect both upper and lower hinges for visible damage, rust, or stripped screw holes
- Check if the hinge pins show excessive wear or if the hinge assembly feels loose
Pro Tip: Place a level against the closed door to determine exactly how much misalignment exists. Even a ¼-inch deviation can prevent proper sealing.
Assessing Gasket and Seal Integrity
While a damaged gasket won’t cause sagging directly, it often accompanies door alignment issues. Examine your freezer door seal by:
- Running your fingers along the entire gasket for cracks, tears, or hardening
- Performing the dollar bill test: Close the door on a dollar bill at various points—significant resistance indicates good sealing, while easy removal suggests problems
- Checking for gaps between the door and cabinet when closed
Essential Tools for Freezer Door Repair
Basic Repair Toolkit
Before starting your repair, gather these essential tools:
– Phillips and flathead screwdrivers
– Adjustable wrench or socket set
– Level
– Pliers
– Replacement hinge kit (specific to your freezer model)
– Cleaning supplies for hinge areas
– Towels for catching any debris
Warning: Always unplug your freezer before beginning any repair work to prevent electrical hazards.
Step-by-Step Freezer Door Repair Process
Adjusting Existing Hinges Without Replacement
Many sagging door issues can be resolved through simple hinge adjustments without full replacement:
- Unplug your freezer and remove all contents from the affected door
- Locate the adjustment screws on both upper and lower hinges
- For top hinge adjustment: Tighten the mounting screws while holding the door in proper alignment
- For bottom hinge adjustment: Loosen the screws slightly, reposition the door, then retighten
- Test the door’s movement after each adjustment—small changes make big differences
- Check alignment with a level after adjustments
Time Estimate: 15-20 minutes for basic adjustments
Replacing Worn Hinges Completely
When adjustments don’t solve the problem, complete hinge replacement becomes necessary:
- Support the door with a helper or door brace to prevent sudden dropping
- Remove all contents from the door shelves
- Carefully unscrew and remove the lower hinge assembly
- Transfer the door to the upper hinge only (with assistance)
- Remove the upper hinge while maintaining door support
- Clean the hinge mounting areas thoroughly
- Install new hinges following manufacturer specifications
- Reattach the door and test operation
Common Mistake: Forgetting to support the door properly during replacement, which can damage the door frame or internal wiring.
Fixing Stripped Screw Holes in Cabinet

Stripped mounting holes in the freezer cabinet require special attention:
- Use longer screws that reach undamaged threads
- Install threaded inserts for permanent repair
- Apply epoxy filler to damaged holes before reinserting screws
- Consider using door hinge repair kits designed for stripped holes
Preventing Future Freezer Door Sagging
Proper Door Usage Habits
Prevent recurring sagging issues by adopting these habits:
– Avoid overloading door shelves with heavy items
– Close the door gently rather than slamming it
– Never use the door as a support when reaching for items
– Distribute weight evenly across door shelves
Regular Maintenance Schedule
Implement these maintenance practices:
– Monthly: Clean hinge areas and check for play
– Quarterly: Lubricate hinges with appliance-safe lubricant
– Annually: Perform comprehensive alignment check
– After moving the freezer: Always check door alignment
When to Call a Professional Technician
Recognizing Beyond-DIY Repairs
While many sagging door issues are DIY-friendly, certain situations require professional help:
- Internal wiring damage visible near hinge areas
- Cracks in the door frame or cabinet
- Persistent alignment problems after multiple repair attempts
- Freezer models with integrated hinge systems that require special tools
Cost Consideration: Professional repair typically costs $150-$300, making DIY fixes worthwhile for most standard models.
Troubleshooting Common Post-Repair Issues
Door Still Sagging After Hinge Replacement
If your door continues to sag after repair:
– Double-check that all mounting screws are fully tightened
– Verify you’re using the correct replacement parts for your model
– Inspect for hidden damage to mounting surfaces
– Consider whether the door itself has become warped
Difficulty Closing the Door After Adjustment
When the door becomes hard to close after fixing sag:
– You’ve likely over-adjusted the hinges
– Loosen the adjustment slightly and retest
– Check for obstructions in the door path
– Ensure the gasket isn’t pinched during closure
Freezer Door Seal Maintenance Tips
Extending Gasket Lifespan
Preserve your door seal with these techniques:
– Clean gaskets monthly with mild soap and water
– Apply a thin coat of petroleum jelly to maintain flexibility
– Never use abrasive cleaners that degrade rubber compounds
– Keep the sealing surface free of food debris and ice buildup
Cost Breakdown for DIY vs. Professional Repair
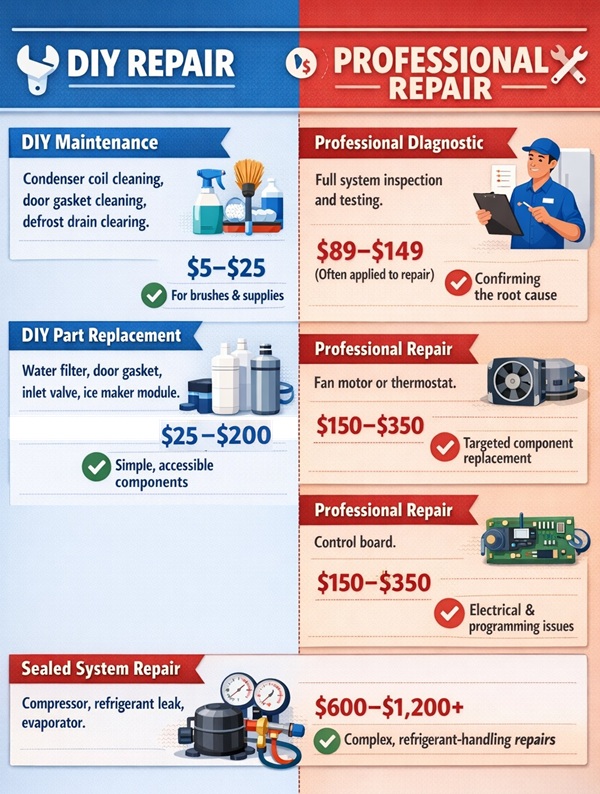
Budget-Friendly Repair Options
| Repair Method | Cost Range | Time Required | Skill Level |
|---|---|---|---|
| Simple adjustment | $0 | 15-20 min | Beginner |
| Hinge replacement | $15-$40 | 30-45 min | Intermediate |
| Professional service | $150-$300 | 1-2 hours | N/A |
Money-Saving Tip: Purchase exact replacement parts directly from the manufacturer rather than generic alternatives for better fit and longevity.
Final Note: A properly aligned freezer door should close smoothly under its own weight and create an immediate seal. By following these steps, you’ve not only fixed your sagging door but also improved your freezer’s efficiency and extended its service life. Regular maintenance checks every few months will prevent most alignment issues from developing. If you encounter persistent problems after following this guide, consult your freezer’s service manual for model-specific considerations or contact the manufacturer for technical support. Remember that proper door alignment isn’t just about convenience—it directly impacts your food safety and energy costs.