How to Clean Freezer Compressor: Easy Steps
Your freezer’s compressor is the powerhouse behind keeping your food safely frozen, but when dust and debris accumulate around this critical component, it has to work significantly harder to maintain proper temperatures. Learning how to clean freezer compressor components properly can prevent excessive energy consumption, reduce wear and tear on your appliance, and avoid costly repairs down the line. Many homeowners don’t realize that a dirty compressor can increase energy usage by up to 25% while shortening the appliance’s lifespan by several years.
This essential maintenance task takes less than an hour but delivers substantial benefits in cooling performance and reliability. Whether you own a standalone chest freezer, upright freezer, or refrigerator-freezer combination unit, the compressor cleaning process follows similar principles regardless of brand or model. By the end of this guide, you’ll know exactly how to locate your compressor, safely clean it without causing damage, and establish a maintenance schedule that keeps your freezer operating at peak efficiency.
Locate Your Freezer’s Compressor Access Point
Before attempting to clean your freezer compressor, you need to identify exactly where it’s located on your specific model. Standalone freezers typically house the compressor at the rear bottom section, while refrigerator-freezer combinations often place it behind a removable front kickplate or at the rear bottom behind an access panel.
For upright freezers, unplug the unit and carefully move it away from the wall (leave at least 6 inches of clearance during operation). Examine the back panel to locate the compressor – it appears as a black cylindrical or rectangular metal housing with copper refrigerant lines attached. The condenser coils, which work in tandem with the compressor, may be visible as a series of zigzagging metal tubes mounted on the back of the unit.
Front-access compressors require removing the kickplate at the bottom front of the appliance. Look for 2-4 screws along the bottom edge of this panel, usually Phillips or flathead screws. After removing these screws, gently pull the panel away to reveal the compressor assembly. Take a clear photo of the configuration before proceeding, as this visual reference proves invaluable during reassembly.
Gather the Right Tools for Safe Compressor Cleaning

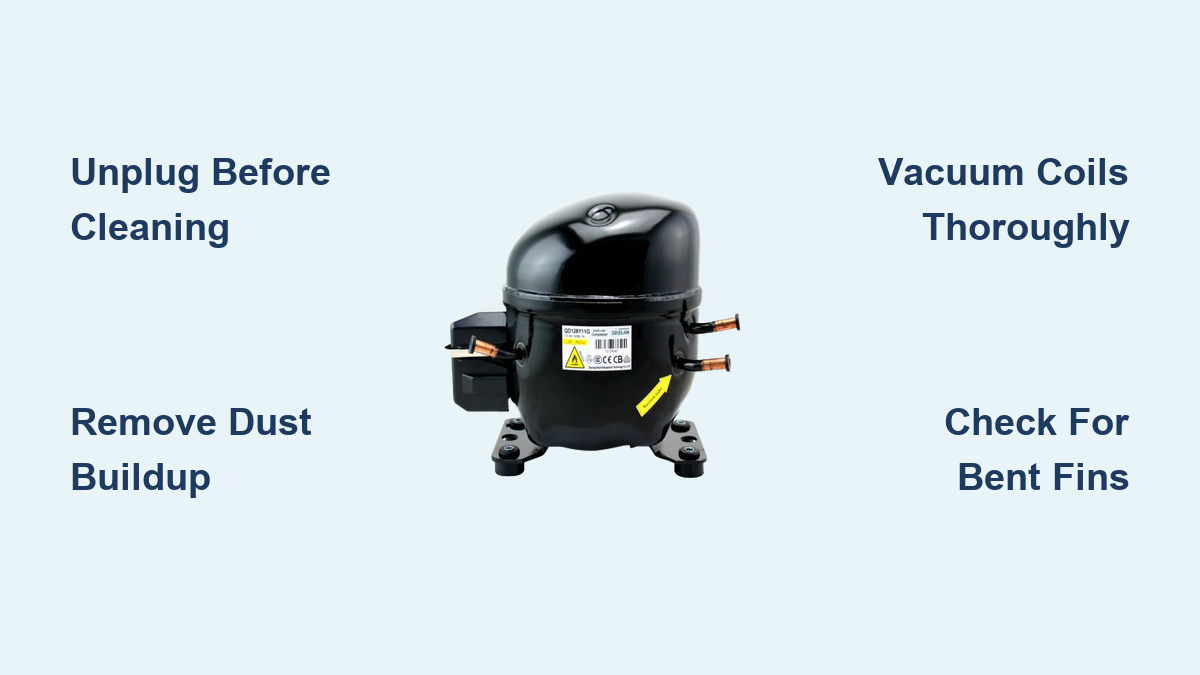
Using proper tools prevents accidental damage to delicate components while ensuring thorough cleaning. For effective how to clean freezer compressor maintenance, you’ll need a specialized coil brush with soft nylon bristles designed specifically for refrigerator coils – these typically cost $5-$15 and pay for themselves through extended appliance life.
Pair this with a crevice tool attachment for your vacuum cleaner to reach between tight coil spaces and along the compressor housing. A handheld vacuum with strong suction works best for this task, offering greater maneuverability in confined spaces behind your appliance.
Complete your toolkit with microfiber cloths (which leave no lint behind), a flashlight for illuminating dark areas, and a small screwdriver set for removing access panels. For severe buildup, consider a condenser coil cleaning spray, but avoid harsh chemicals that could damage components. Always work in a well-ventilated space and keep electrical components protected from moisture throughout the process.
Safety First: Proper Power Disconnection Procedure

Electrical safety must precede any compressor cleaning procedure. Locate the freezer’s power cord at the back or side and unplug it completely from the wall outlet. For built-in or hardwired units, turn off the dedicated circuit breaker and verify power is disconnected by checking the control panel display.
Wait at least 30 minutes after disconnecting power before touching the compressor. This cooling period allows residual refrigerant pressure to equalize and prevents burns from hot compressor surfaces, which can exceed 200°F during operation. The waiting period also ensures any electrical capacitors discharge safely.
Never attempt to clean the compressor while the freezer is running or has recently operated. The combination of moving parts, electrical components, and extreme temperatures creates serious hazards that outweigh any time savings from skipping this critical step. Your safety should always come first when performing appliance maintenance.
Remove Surface Debris Before Deep Cleaning
With power safely disconnected and the compressor accessible, begin by removing larger debris by hand. Gently brush away accumulated dust bunnies, pet hair, and debris from around the compressor housing and condenser coils. Work carefully to avoid bending delicate copper tubing or disturbing electrical connections.
For coils with significant buildup, use your coil brush to gently sweep between the tubing, working from top to bottom to avoid crushing the coil structure. Apply firm but gentle pressure – the goal is to dislodge debris without damaging the coil integrity. Focus on areas where dust has formed thick layers that restrict airflow.
Pay special attention to the compressor’s cooling fan if your unit has one. Hair and debris wrapped around fan blades create imbalanced rotation that strains the motor. Carefully cut away tangled material with scissors if necessary, then wipe blades clean with a damp cloth. This step alone can restore significant cooling capacity to an overworked system.
Vacuum Thoroughly to Extract Embedded Particles
After manual debris removal, vacuuming extracts the remaining dust that brushing dislodged but didn’t remove. Attach the crevice tool to your vacuum hose and work along the entire length of the condenser coils, inserting the tool between each coil spacing to pull out trapped particles. Move slowly to allow sufficient suction time for stubborn debris.
Vacuum around the base of the compressor housing, where dust tends to accumulate in dense mats that severely restrict airflow. Use the brush attachment to sweep debris toward the vacuum inlet rather than blowing it further into the appliance. For particularly compacted dust, a soft paintbrush works effectively to loosen particles before vacuuming.
Don’t neglect the surrounding floor area beneath and behind the freezer. This accumulated dust continuously cycles back into the appliance whenever the fan operates, creating a recurring cleaning challenge. Removing this source material extends the time between required maintenance sessions.
Clean Hard-to-Reach Areas Around the Compressor
Certain areas around the compressor require specialized attention to ensure complete cleaning. The electrical connection point where wiring enters the motor housing often accumulates hazardous dust that poses fire risks. Use a dry, soft brush to gently clear debris from this area without disturbing connections.
Inspect the rubber vibration dampening feet or mounts that isolate the compressor from the cabinet. These components can deteriorate over time, and accumulated debris on or around them affects their performance. Clean around each mount without moving or adjusting the compressor position, as disturbing these components can introduce new vibration issues.
Check the condenser fan motor bearings if your unit has an accessible fan. While you shouldn’t lubricate these components without specific manufacturer guidance, you can clean accumulated debris from the motor housing and fan guard. Ensure the fan blades spin freely by gently rotating them by hand after cleaning.
Wipe Down External Components for Optimal Heat Dissipation
With internal components cleaned, turn attention to the compressor housing and surrounding external surfaces. Dampen a microfiber cloth with water (no cleaning solutions necessary for most applications) and wipe down the compressor body to remove greasy dust accumulation. This surface cleaning improves heat dissipation and reduces fire hazards.
Clean the condenser coil fins if your unit has exposed fins rather than tubing. These thin aluminum or copper fins compress easily and are difficult to repair if damaged. Use a fin comb to gently straighten any bent fins you discover. Bent fins restrict airflow significantly, reducing cooling efficiency by up to 30%.
Wipe down any accessible refrigerant tubing, being careful not to bend or manipulate the lines. Also clean the access panel or kickplate before reinstalling it, as dust on these surfaces gets drawn into the appliance when the fan operates.
Reassemble Properly and Restore Power Safely

With cleaning complete, replace any access panels in their original positions, ensuring all attachment screws are tightened securely but not overtightened. Stripped screw holes create rattling noises and eventually allow panels to fall off during operation.
For rear-access units that were tilted during cleaning, carefully return them to their upright position. Allow the appliance to sit undisturbed for at least four hours before restoring power. This settling period allows any refrigerant that may have shifted during movement to return to proper positioning.
When restoring power, plug in the unit and wait an additional 2-4 hours before loading food. This initial cooling period allows the compressor to establish proper cycling without the added thermal load of room-temperature contents. Monitor the appliance during its first full cycle to verify normal operation and listen for any unusual sounds.
Establish a Preventive Maintenance Schedule
Consistent maintenance prevents the heavy debris accumulation that forces compressors to work harder and fail prematurely. For typical household environments, cleaning the freezer compressor and condenser coils every six to twelve months maintains optimal performance. Homes with pets, dusty environments, or multiple occupants may benefit from quarterly cleaning.
Between deep cleanings, maintain clear airflow around the appliance by keeping the surrounding area free of stored items and debris. Ensure at least two inches of clearance between the rear of the unit and the wall for rear-venting models, and maintain similar clearance for front-venting units.
Monthly visual inspections catch developing problems before they escalate. Take a minute to glance at the compressor area during routine cleaning, and note any dust accumulation, unusual sounds when the compressor cycles, or visible damage to components. Early intervention prevents costly repairs and food loss from cooling failures.
Recognize When Professional Service Is Needed
Understanding when compressor issues require professional service rather than simple cleaning protects your investment and prevents food spoilage. A compressor that runs continuously without cycling off indicates it’s struggling to achieve the target temperature. After cleaning coils, if continuous operation persists for more than 24 hours, contact a licensed technician.
Unusual sounds including clicking, buzzing, humming, or rattling from the compressor area suggest mechanical problems requiring expert diagnosis. While some noise is normal during startup and shutdown, grinding, knocking, or excessive vibration indicates worn bearings, loose components, or internal damage.
Excessive frost accumulation in the freezer compartment, warm exterior surfaces near the compressor, or significantly increased energy bills all indicate compressor or cooling system problems. These symptoms often persist after thorough cleaning and require professional service to diagnose and repair underlying issues.