How to Change Samsung Fridge Filter
That refreshing glass of water from your Samsung refrigerator should taste clean and pure—until it doesn’t. When your water develops an odd taste or your ice maker slows down, a clogged water filter is often the culprit. Learning how to change filter on Samsung fridge freezer takes less than 15 minutes and ensures your family continues enjoying high-quality drinking water while protecting your appliance from sediment damage. Most Samsung models follow the same straightforward replacement process, though reset procedures vary slightly between models. This complete guide walks you through every step—from locating the filter to resetting indicator lights—so you can complete the job confidently without calling for service.
Locate Your Samsung Filter Access Panel
Open your refrigerator door and scan the upper right interior corner—this is where 95% of Samsung models position the water filter housing behind a discreet access panel. The panel typically features a small grip edge or release tab designed for tool-free removal. Press the tab or grip the panel’s edge firmly and pull it straight out; it should snap free with minimal pressure. Behind this panel sits your cylindrical filter cartridge with distinctive grip ridges along its exterior for easy handling.
If you don’t immediately spot the access panel in this standard location, consult your owner’s manual—some older or specialty Samsung models place the filter in alternative positions like the base grille or interior ceiling. Never force the panel if it doesn’t release easily; check for hidden latches or secondary release mechanisms. Most Samsung filters feature orientation arrows on the cap that must align with housing indicators during installation, so take note of these markers before removing the old filter.
Gather Essential Replacement Supplies
Before touching the filter, collect three critical items: your new Samsung-approved replacement filter (model-specific to your refrigerator), a clean cloth for potential drips, and access to your water supply valve. Using non-genuine Samsung filters risks improper fit and reduced filtration performance—check your model number against the filter packaging to confirm compatibility. As you unpackage the new filter, keep the protective cap in place until installation begins, and locate the plastic seal covering the filter’s inlet and outlet ports.
This protective seal must be completely removed before installation—leaving any portion intact restricts water flow and damages your system. Inspect the new filter for cracks, dents, or manufacturing defects; a compromised filter housing can cause leaks or fail to purify water effectively. While you won’t need tools for this job, having a small container nearby helps catch residual water during removal—this simple preparation prevents messy spills on your refrigerator shelves.
Cut Water Supply to Prevent Flooding

Locate your refrigerator’s water supply valve immediately behind the appliance or near its connection point under your kitchen sink. Rotate this valve clockwise until it stops completely—this crucial step prevents accidental flooding during filter replacement. After shutting off the water, dispense approximately one cup of water from your refrigerator’s dispenser to relieve system pressure. Skipping this pressure relief step often causes surprise water gushes when removing the old filter, so take this precaution seriously.
With the water supply secured and pressure relieved, you’ve created a safe working environment for filter replacement. Check that the valve remains fully closed as you proceed—accidentally bumping it open mid-replacement could flood your kitchen. This preparation takes less than two minutes but prevents the most common and damaging mistake during Samsung filter changes.
Remove the Saturated Filter Safely
With your access panel removed, grasp the old filter firmly using the grip ridges on its exterior surface. Rotate the filter counterclockwise until you feel it unlock from the housing mechanism—this twist-lock design requires approximately a quarter-turn for release. Pull the filter straight out with steady pressure; some residual water will drip, so position your cloth beneath the housing opening.
After removal, inspect the housing interior for visible sediment buildup—accumulated debris indicates your filter has been working hard to protect your system. Wipe the housing with a clean, damp cloth and check the O-ring seal for proper positioning and damage. A compromised O-ring causes most post-replacement leaks, so ensure this rubber gasket sits flush in its groove before installing the new filter. Discard the old filter immediately to avoid accidental reinstallation.
Insert the New Filter with Precision
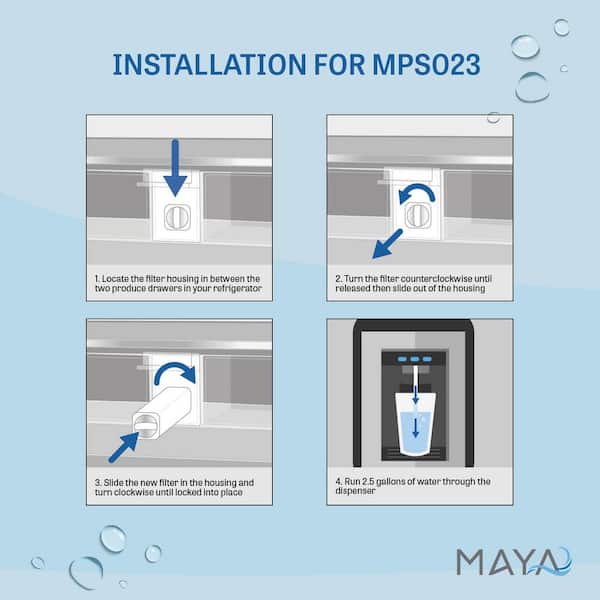
Before inserting your replacement filter, verify its orientation—Samsung filters fit in only one direction. Align any arrows or markers on the filter cap with corresponding indicators on the housing; improper alignment prevents full seating and causes leaks. Push the new filter straight into the housing with firm, even pressure until it stops at the fully seated position. If you encounter resistance, remove the filter and confirm you’ve completely discarded the protective seal.
Once fully inserted, rotate the filter clockwise until you hear a distinct click—this auditory confirmation signals proper locking engagement. Do not overtighten; forcing rotation past the natural stopping point damages internal threads. The filter should now sit flush with the housing, with no gaps or protrusions visible. Proper installation takes less than 30 seconds but ensures leak-free operation for the next six months.
Flush and Reset After Installation
Turn your water supply valve counterclockwise to restore water flow, then immediately check for leaks around the filter housing. Dispense water continuously for three to five minutes—this critical flushing process clears manufacturing residue and air pockets from the new filter medium. Initial water may appear cloudy or contain black particles; this normal occurrence indicates effective carbon filter activation.
After flushing, reset your refrigerator’s filter indicator light by pressing and holding the designated reset button for three to five seconds. The indicator should change from red or amber to blue or green, confirming successful reset. Skipping the reset fools your refrigerator into thinking the old filter remains installed, potentially triggering premature replacement alerts. Some models require navigating control panel menus for reset—consult your manual if the standard button press doesn’t work.
Maintain Your Filter Replacement Schedule
Samsung recommends replacing your water filter every six months under normal usage, but households with hard water or high consumption should replace filters every four months. Watch for early warning signs like reduced water flow, odd tastes, or cloudy ice—these indicate your filter has reached capacity before the six-month mark. Never ignore the filter indicator light; continuing to use a saturated filter allows contaminants to bypass the filtration system.
Store replacement filters in a cool, dry place and check expiration dates before installation—expired filters lose effectiveness even when unused. After vacations or extended absences, run the dispenser for 30 seconds before drinking to clear stagnant water from the lines. Consistent filter maintenance protects your ice maker from mineral buildup and extends your refrigerator’s operational life by years.
Fix Common Post-Installation Problems
If your new filter won’t lock into place, first verify correct model compatibility—Samsung filters aren’t universal across refrigerator lines. Push the filter fully against the housing backstop before rotating; insufficient insertion prevents locking engagement. For persistent leaks, turn off water supply and recheck O-ring positioning—this tiny component causes 80% of post-replacement leaks.
Reduced water flow after installation usually means inadequate flushing—continue dispensing water for several additional minutes. If flow doesn’t improve, the new filter may be defective; try a replacement cartridge before assuming system failure. Never use pliers or tools on the filter—Samsung’s design requires only hand-tight installation to prevent damage to plastic components.
Complete Samsung Filter Replacement Checklist
Follow these eight critical steps for successful filter replacement: 1) Locate and open the access panel in the upper right interior corner, 2) Shut off water supply and relieve pressure, 3) Rotate old filter counterclockwise and remove, 4) Prepare new filter by removing protective seal completely, 5) Insert new filter with proper alignment and rotate clockwise until clicking, 6) Restore water supply and check for leaks, 7) Flush system for 3-5 minutes, 8) Reset filter indicator light. Keep replacement dates in your calendar—set phone reminders three days before your six-month interval ends. Monitoring water quality and flow rate provides early warnings when filters need premature replacement. With this simple maintenance routine, your Samsung fridge freezer delivers pure, great-tasting water reliably for years to come.