How to Fix GE Freezer Fan Not Working
Your GE freezer fan suddenly stops working, and within hours, frost begins accumulating on the back wall like an unexpected winter storm. Ice cream containers soften while vegetables freeze solid in another corner, and that familiar hum of consistent cooling falls silent. This common yet urgent issue threatens your entire frozen food inventory and stresses other critical components. When your GE freezer’s evaporator fan fails, temperature regulation collapses—leading to spoiled food, excessive energy consumption, and potential compressor damage. This comprehensive troubleshooting guide delivers actionable solutions you can implement today, from simple resets to component replacement, saving you costly service calls while protecting your food investment.
Most GE freezer owners don’t realize their appliance contains two separate fans: the evaporator fan inside the freezer compartment that circulates cold air, and the condenser fan (on some models) that helps dissipate heat from the compressor. When the evaporator fan fails, the entire cooling system becomes compromised. Unlike a complete power failure, a malfunctioning fan often presents subtle warning signs before total breakdown. Recognizing these early indicators gives you precious time to address the problem before food spoilage occurs. Whether you own a GE Profile, Café series, or standard model, this guide covers the specific diagnostic steps and repairs tailored to GE’s unique freezer designs.
Identify Your Freezer’s Specific Fan Failure Symptoms
Your GE freezer communicates fan problems through distinctive symptoms that differ from general cooling issues. Learning to decode these signals prevents misdiagnosis and wasted effort on unrelated components. The evaporator fan’s primary job is circulating cold air from the evaporator coils throughout the freezer compartment—when it stops, temperature distribution becomes erratic and unpredictable.
Listen for abnormal operational sounds that reveal fan motor condition. A healthy GE freezer evaporator fan produces a consistent, low-pitched hum that cycles on and off with the compressor. When problems develop, you might hear intermittent clicking as the motor attempts to start but lacks sufficient torque, or a high-pitched whine indicating bearing failure. Some models emit a rhythmic thumping sound when ice buildup partially obstructs the fan blade’s rotation. Complete silence from the freezer compartment after the compressor shuts off suggests total fan failure, while unusual buzzing indicates electrical issues within the motor windings.
Monitor temperature inconsistencies that manifest within 24 hours of fan failure. Use a standalone freezer thermometer placed in multiple locations—near the back wall, center of the compartment, and front door bins—to detect temperature variations. A working fan maintains uniform temperatures within 2-3 degrees throughout the compartment. When the fan fails, you’ll notice dramatic differences: the back wall might read -10°F while door bins hover near 15°F. Food packages closest to the evaporator coils develop excessive frost or ice crystals, while items near the door begin thawing despite the freezer appearing otherwise functional.
Check frost accumulation patterns that provide critical diagnostic clues. Normal frost forms evenly during defrost cycles and melts away completely. Problematic frost appears rapidly on the back wall and evaporator coils, forming thick, spiky ice formations that resemble miniature glaciers. This happens because without airflow, moisture in the air deposits directly onto the coldest surface—the evaporator coils—rather than circulating and condensing evenly. Some GE models develop frost specifically on food packaging, creating “frost volcanoes” that erupt from container seams as moisture escapes and immediately freezes.
Verify Power and Basic Operational Conditions First
Before dismantling your freezer, confirm these fundamental issues that account for 30% of apparent fan failures. Many GE freezer owners waste hours diagnosing complex problems when the solution requires only a simple reset or adjustment.
Reset the freezer’s electrical system completely by unplugging for 10 full minutes—this clears temporary control board glitches that disable fan operation. GE’s electronic controls sometimes lock components in a non-operational state after power fluctuations. During the reset period, manually rotate the fan blade through the access panel to free any ice binding. When reconnecting power, listen carefully for the distinct click of relay activation followed by fan startup within 2-3 minutes of compressor engagement.
Confirm proper freezer loading practices that maintain adequate airflow. GE specifically warns against overpacking freezers beyond 75% capacity, as this restricts air circulation even with a functioning fan. Check that no food containers obstruct the rear air vents or rest directly against the back wall where the evaporator fan resides. Rearrange contents to create at least 2 inches of clearance around all sides of stored items, particularly near the rear wall where airflow originates.
Test the door seal integrity using the dollar bill method at multiple points around the perimeter. A compromised seal forces the fan to work harder to maintain temperature, sometimes triggering safety cut-offs that disable the fan. Pay special attention to the upper corners where seals commonly fail first. Clean gaskets thoroughly with a vinegar-water solution to remove food residue preventing proper sealing. Replace damaged seals immediately—GE part numbers typically begin with WR and can be ordered directly using your model number.
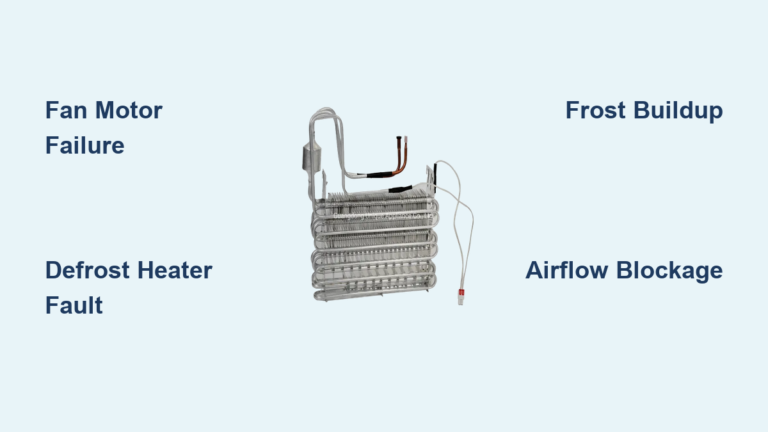
Perform Targeted Fan Assembly Inspection

With power disconnected, remove the rear interior panel to access the evaporator fan assembly—this critical inspection reveals 60% of fan failures without specialized tools. Most GE freezers secure this panel with 4-6 Phillips screws along the edges, though newer models use plastic retaining clips that require gentle prying with a plastic putty knife.
Examine fan blade movement by manually rotating it clockwise. The blade should turn smoothly through 360 degrees with minimal resistance. Stiffness or grinding indicates ice binding or bearing failure. Thaw any visible ice with a hairdryer on low heat, keeping the nozzle 12 inches from components to prevent overheating. Never use sharp tools to break ice, which can damage the delicate blade. If the blade rotates freely but the motor doesn’t engage when powered, the problem lies in the motor or control circuitry.
Inspect motor mounting integrity for signs of vibration damage. GE uses specific anti-vibration mounts that degrade over time, allowing the motor to shift position and bind the fan blade against the housing. Check for cracked rubber mounts or stripped screw holes in the plastic housing. Tighten all mounting screws to manufacturer specifications—typically 25-35 inch-pounds torque. Loose mounts create harmonic vibrations that accelerate bearing wear and cause premature failure.
Verify wiring harness connections at both the motor and control board ends. Unplug and reconnect each connector to clean oxidation from contacts, applying dielectric grease to prevent future corrosion. GE’s fan circuits commonly fail at the connector points due to thermal cycling. Look for “backout” conditions where pins have partially withdrawn from connectors—this creates intermittent operation that mimics motor failure. Secure loose pins with a small amount of electrical tape around the connector housing.
Test Fan Motor Electrical Operation
When visual inspection doesn’t reveal the problem, electrical testing confirms whether the motor itself has failed or if control circuitry is at fault. This step requires a digital multimeter costing less than $25 at any hardware store.
Measure resistance across motor terminals with the harness disconnected. Set your multimeter to the lowest ohms setting (usually 200Ω) and touch probes to the two motor terminals. A healthy GE evaporator fan motor typically shows 15-50 ohms resistance. Infinite resistance (OL reading) indicates an open winding—the motor has failed and requires replacement. Zero resistance suggests a short circuit, also requiring replacement. Some GE models incorporate thermal overload protectors that temporarily open the circuit when overheated—allow the motor to cool completely before retesting.
Check for ground faults by measuring resistance between each terminal and the motor housing. Any continuity reading (beep or low resistance) indicates the motor winding has shorted to the case, creating a serious electrical hazard. Immediately disconnect power and replace the motor—continued operation could damage other components or create shock risks. GE specifically warns against operating freezers with grounded motors due to potential control board damage.
Test voltage delivery during normal operation to confirm the control system is sending power. With the freezer running normally, carefully measure AC voltage at the fan harness connector (use extreme caution near live components). Most GE freezer fans operate on 110-120V AC. No voltage indicates a control board or thermostat problem. Intermittent voltage suggests a failing relay on the control board. Consistent voltage with no motor operation confirms motor failure.
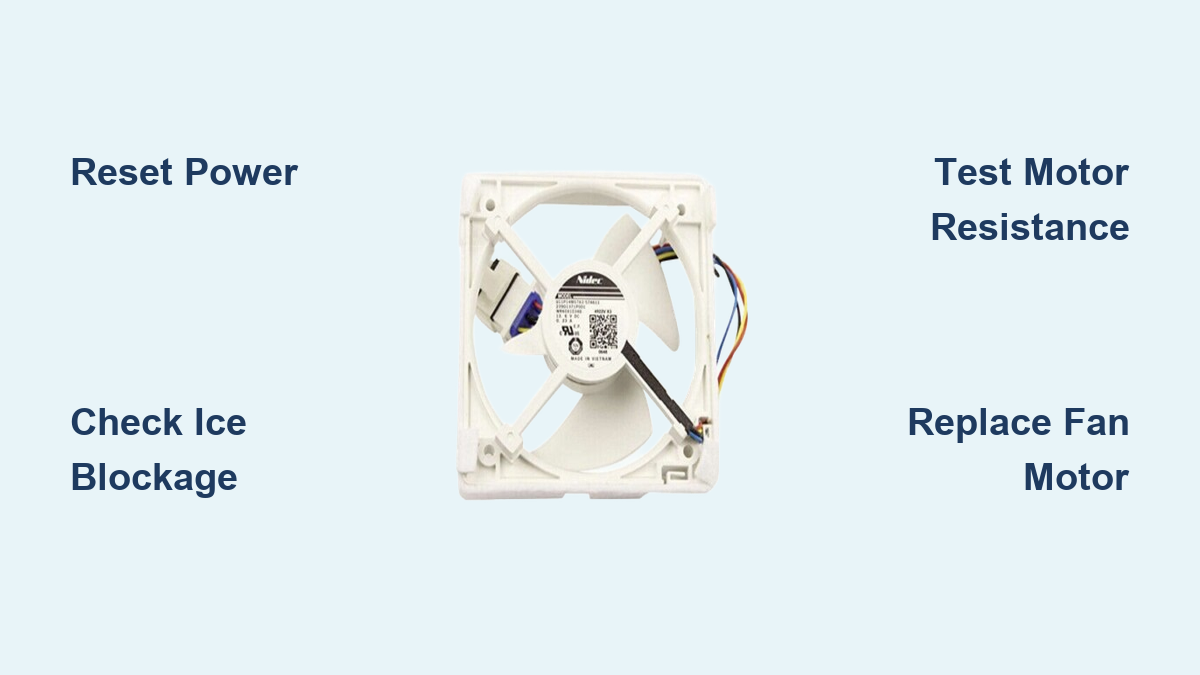
Replace Failed Fan Motor Components
When testing confirms motor failure, replacement becomes necessary. GE evaporator fan assemblies typically cost $45-180 depending on your specific model—significantly less than a service call. The repair takes 45-90 minutes for most homeowners with basic tools.
Source the exact replacement part using your complete model number (found inside the freezer on the right wall). Search using “GE WR” part numbers rather than generic descriptions—minor variations between model years create compatibility issues. For example, WR60X10283 fits many Profile models while WR60X10328 serves Café series. Verify the replacement matches your original in mounting configuration, blade size, and electrical connector type—photos of both assemblies should be identical.
Follow safe disconnection procedures before removing the old motor. Label each wire connection with tape before disconnecting to prevent miswiring. Support the motor assembly with one hand while removing mounting screws with the other—these components weigh 2-3 pounds and can damage wiring if dropped. Note the orientation of any spacers or washers for correct reinstallation. GE redesigned many fan assemblies after 2018 with improved bearings—consider upgrading to the latest revision if available.
Install the new motor with attention to critical details. Apply a small amount of dielectric grease to the electrical connector before mating to prevent future corrosion. Ensure the fan blade rotates freely without contacting housing—GE specifies minimum 1/8 inch clearance. Before final reassembly, plug in the freezer and verify fan operation for 5 full minutes, checking for unusual vibration or noise. If the fan doesn’t start, double-check wiring orientation—some GE models require specific terminal connections.
Prevent Recurring Fan Failures

GE freezer owners who implement these targeted maintenance practices extend fan motor life by 2-3 years beyond average service life. The evaporator fan operates continuously under demanding conditions—proactive care reduces stress on critical components.
Schedule seasonal defrost cycles for manual-defrost models when frost exceeds 1/4 inch thickness. Use a plastic scraper to remove ice buildup near the fan assembly, maintaining at least 1 inch clearance around the entire motor housing. Frost-free models require checking defrost system operation—listen for the defrost heater activating every 6-12 hours and completing cycle within 30 minutes.
Clean condenser coils every 6 months using a dedicated coil brush to maintain optimal system efficiency. Dirty coils force the entire cooling system to work harder, increasing evaporator fan runtime by up to 25%. GE recommends vacuuming coils from behind the unit while wearing protective gloves to avoid sharp metal edges.
Maintain proper freezer loading practices that support consistent airflow. GE engineering specifies minimum 2-inch clearance between stored items and the rear wall where the evaporator fan operates. Use mesh baskets instead of solid containers to allow air movement through stored items. Avoid placing hot foods directly into the freezer, which creates excess moisture that accelerates frost buildup on fan components.
When your GE freezer fan stops working, systematic diagnosis prevents unnecessary part replacements and wasted effort. Start with the simplest explanations—power issues, door seals, and ice blockages—before progressing to electrical testing and component replacement. Most fan failures can be resolved in under two hours with basic tools, preserving your food investment and extending your appliance’s service life. If you encounter complex control board issues or refrigerant system problems, consult a certified GE technician—some repairs require specialized tools and EPA certification. Regular maintenance and proper usage practices significantly reduce fan-related failures, keeping your freezer operating efficiently for years to come.