How to Soften Butter from Freezer Quickly
Few kitchen frustrations match trying to spread rock-hard frozen butter onto warm toast or incorporate it into a cake batter. Freezer temperatures cause the water in butter to crystallize, turning your creamy dairy into a stubborn block that resists knives, graters, and even determined thumbs. Whether you’re mid-recipe or simply want breakfast ready faster, knowing how to soften butter from freezer conditions is an essential kitchen skill that saves time and prevents recipe disasters.
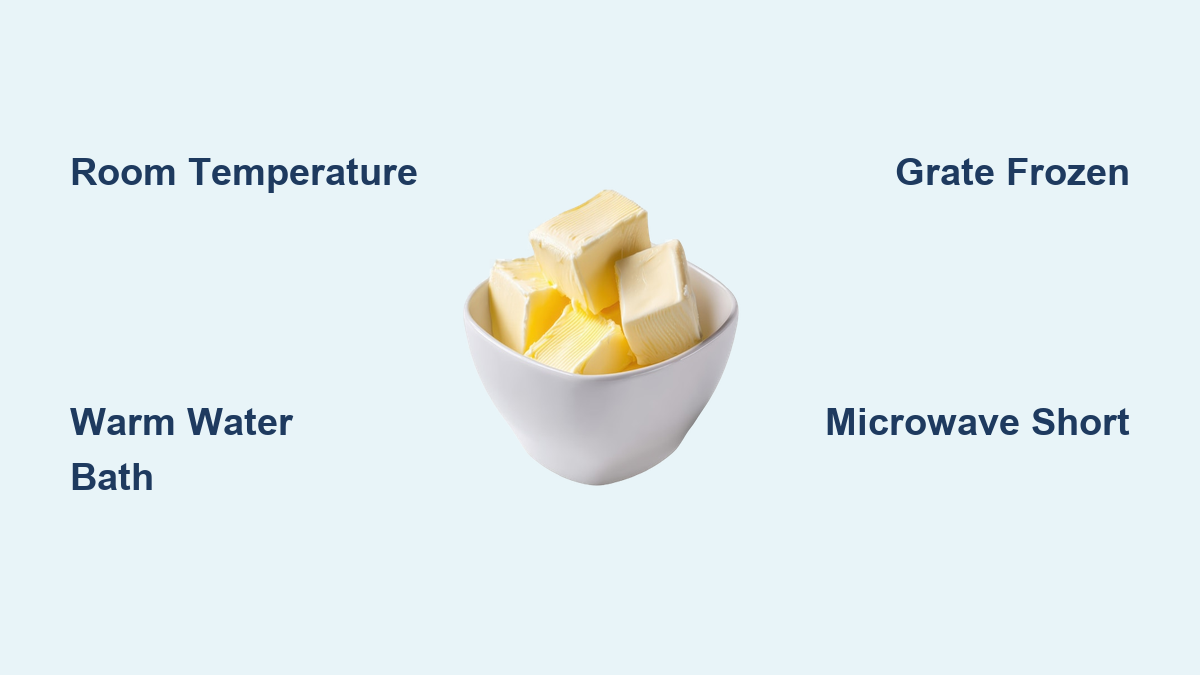
The good news is that several proven methods exist, ranging from patient room-temperature approaches to faster techniques using common kitchen tools. The method you choose depends on how much time you have and what you’re using the butter for. Bakers need precisely softened butter at specific temperatures for proper creaming, while toast enthusiasts simply need spreadable consistency. This guide covers every reliable technique, from the safest slow-and-steady approaches to faster shortcuts when you’re pressed for time.
Why Freezer Butter Is So Hard to Work With Immediately
Understanding the science behind frozen butter helps you soften it more effectively. Butter consists of fat, water, and milk solids, all intertwined in a specific molecular structure. When temperatures drop below freezing, the water molecules form rigid crystals that lock everything into an extremely dense configuration. This crystallization is why frozen butter can feel almost like a stone and why it requires specific techniques to soften without turning it into a melted mess.
The goal when softening freezer butter is to gently disrupt these crystals without fully melting the fat. Melting changes butter’s chemical structure, which matters enormously for baking applications. When recipes call for “room temperature butter,” they specifically need the crystalline structure partially reformed but softened enough to trap air during creaming. Melted butter cannot replicate this texture, resulting in dense, flat, or greasy baked goods. The techniques that follow work with butter’s natural properties to restore that ideal spreadable state.
Room Temperature Softening Method for Perfect Baking Results
The safest and most reliable way to soften butter from freezer conditions is simply letting it sit at room temperature. This method works with butter’s natural properties, producing evenly softened results without any risk of partial melting or hot spots. The trade-off is time—you’ll need to plan ahead by at least 30 to 60 minutes.
Start by removing the butter from the freezer and unwrapping it completely. Removing packaging exposes more surface area to the ambient air, speeding the softening process considerably. If your butter is in a stick format, consider cutting it into smaller chunks or slices. Each cut exposes fresh surfaces that warm air can reach, potentially cutting your wait time in half. Place the unwrapped butter on a plate or in a shallow dish, positioning it away from direct sunlight, heat vents, or any warm appliances.
Check the butter every 15 minutes by gently pressing the surface with your finger. Properly softened butter will yield to pressure and spring back slightly, leaving an indent but maintaining its shape. The entire process typically takes 30 to 60 minutes depending on your room temperature and how frozen the butter was initially. Warmer kitchens (around 70-72°F) speed things along, while cooler rooms may require the full hour. This method produces the most consistent results for baking because the butter softens evenly throughout rather than just on the surface.
Pro Tip: For best baking results, leave butter at room temperature for at least 30 minutes after it feels soft to the touch—this ensures the center reaches optimal temperature for proper creaming with sugar.
Warm Water Bath Technique for Even Softening

When you need softened butter faster than room temperature allows, a warm water bath offers a controlled solution that softens evenly without melting. This technique works by surrounding the butter with gentle, consistent warmth that penetrates through wrapping and gradually relaxes those frozen crystals.
Begin by wrapping your frozen butter tightly in plastic wrap or sealing it inside a zip-top bag. This barrier prevents water from soaking into the butter while still allowing warmth to transfer through. Fill a large bowl with warm water—not hot, which could partially melt the outer layers, and not tepid, which won’t transfer enough heat. The ideal temperature feels comfortably warm to your touch, around 100-110°F, similar to a warm bath.
Submerge the wrapped butter completely in the warm water and let it sit for 10 to 15 minutes. The water will gradually cool during this time, so if you have more than 15 minutes before you need the butter, consider changing the water halfway through for consistently warm conditions. After 10 to 15 minutes, remove the butter, unwrap it, and check the consistency. It should feel noticeably softer and yield to pressure, though it may still be slightly cooler in the very center. A second 5-minute bath resolves any remaining firmness. This method works particularly well when you need multiple sticks softened simultaneously, as you can bundle several wrapped sticks together in the same water bath.
Grate Frozen Butter for Immediate Results
One of the fastest ways to soften butter from freezer state is also one of the simplest: grating it into pieces. A cheese grater transforms a solid block into thin ribbons or shreds with dramatically increased surface area, allowing the butter to absorb ambient warmth and soften in just 5 to 10 minutes.
Use the large holes of a standard box grater or the medium setting on a flat grater. Hold the frozen butter firmly and grate directly onto a plate or into a mixing bowl. The shreds will be somewhat crumbly rather than smooth, which is actually advantageous for many baking applications. When these thin ribbons soften, they incorporate into batters and doughs more readily than solid sticks, distributing evenly throughout the mixture.
This method shines particularly for recipes like cookies, quick breads, and pie crusts where you need butter distributed throughout the flour mixture. Cold butter pieces create steam pockets during baking, producing flaky textures, and the grated format ensures each tiny piece reaches the perfect temperature quickly. Once grated, spread the pieces out rather than clustering them together, as loose arrangement softens faster than a piled mound. You can also use this technique when you realize mid-recipe that your butter is still frozen—grating directly into your mixing bowl allows immediate incorporation with other ingredients.
Microwave Softening Without Melting Disaster
The microwave offers the fastest path from frozen to softened butter, but it requires careful technique to avoid partial melting, uneven heating, or completely liquid butter. When done correctly, this method takes just 1 to 2 minutes total, making it invaluable when you’re already mid-recipe and forgot to thaw your butter earlier.
The key to microwave success is using the lowest power setting and very short intervals. Cut your frozen butter into smaller pieces to promote even warming—quartering a standard stick works well. Place the pieces on a microwave-safe plate, ensuring they’re spread out with space between each piece. Set your microwave to defrost mode if available, or 10% power if not.
Heat in very short bursts of just 5 to 10 seconds, removing the plate and checking the butter after each interval. The butter will feel only slightly warmer to the touch even when properly softened, so go by visual cues and texture rather than assuming it needs more time. You’re looking for the butter to yield when pressed but still hold its shape completely. If you see any glossy, shiny surfaces or, worse, liquid pooling, you’ve overheated it and should let it cool before using—melted butter cannot substitute for softened in most recipes. The entire process typically requires 2 to 4 intervals depending on your microwave’s power and how frozen the butter was.
Critical Warning: Never use full power to soften frozen butter—this will create hot spots that melt the exterior while the center remains frozen.
How to Tell When Butter Is Perfectly Softened
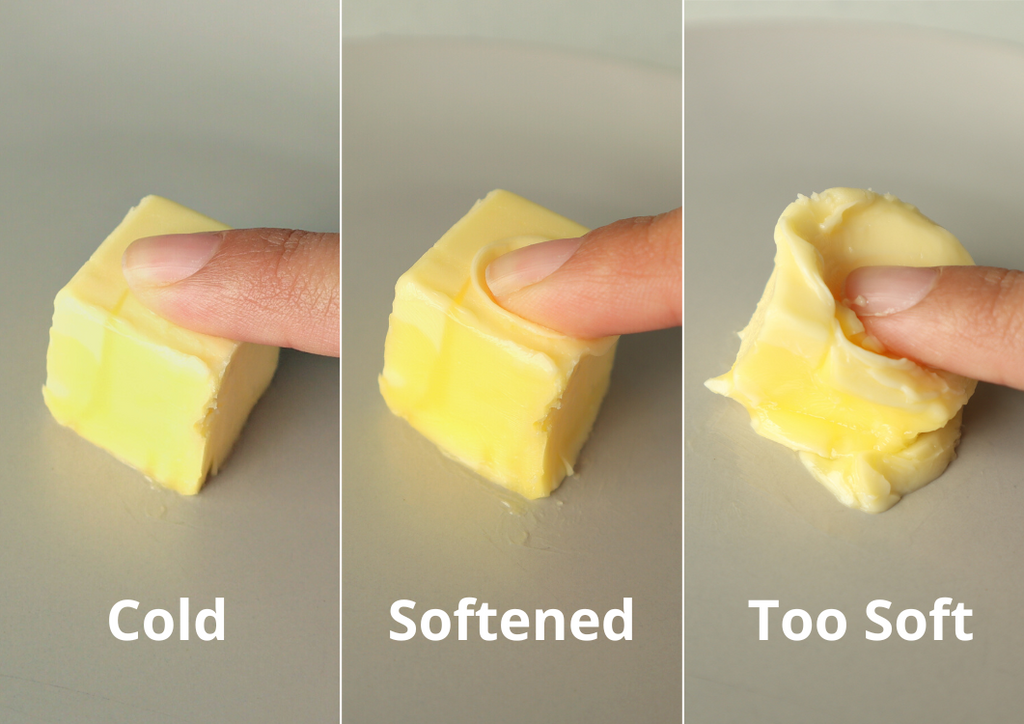
Knowing when butter has reached the ideal softened state prevents both under-softening (still too hard to work with) and over-softening (approaching melting). Several reliable indicators help you judge readiness accurately, regardless of which softening method you used.
The finger test remains the most reliable indicator. Press your thumb firmly into the side of the butter stick. Properly softened butter will indent cleanly under pressure and hold that shape briefly before slowly springing back. The surface should feel smooth and yielding, not greasy or slick, and there should be no hard center visible when you cut into it. The color should be a consistent, pale yellow throughout with no white or translucent spots that indicate still-frozen portions.
Visual cues also help confirm readiness. Properly softened butter has a slight sheen or glow on the surface but doesn’t look wet or glossy. When you cut into it, the knife should pass through cleanly without resistance, leaving a smooth surface rather than a crumbly or jagged cut. For baking purposes, the butter should feel room temperature to the touch—not cool from the refrigerator and not warm from recent microwave exposure. This temperature range, typically 65-68°F, ensures it will cream properly with sugar and incorporate air into your batter.
Food Safety Guidelines for Room Temperature Butter
While softening butter for immediate use is safe and practical, proper storage practices prevent food safety issues. Butter left at room temperature for extended periods can develop rancid flavors and allow bacterial growth, though the timeframe is longer than many people assume.
Butter can safely sit at room temperature for several days when stored properly in a butter dish with a cover or in a sealed container. The salt in salted butter provides some protection against bacterial growth, while unsalted butter has a slightly shorter room-temperature window. If your kitchen runs warmer than 75°F, reduce room-temperature storage to no more than a day or two. Signs that butter has been left out too long include off-odors, unusual taste, or visible mold—discard butter showing any of these signs.
For baking applications requiring room-temperature butter, the safest approach is softening only what you need immediately before use. If you soften extra butter, return any unused portions to the refrigerator within two hours of removal from the freezer. This practice preserves quality while eliminating any food safety concerns. Many bakers keep a small amount of butter in a dedicated butter dish for daily use while storing the bulk supply in the freezer or refrigerator, striking a balance between convenience and safety.
Softening Butter Successfully Every Time You Need It
Mastering how to soften butter from freezer conditions gives you flexibility in the kitchen and prevents recipe setbacks. The room temperature method remains the gold standard for baking when you plan ahead, while grating and warm water baths offer faster alternatives for spontaneous cooking situations. The microwave works in a pinch with careful attention to power settings and timing intervals.
Each method has its place depending on your timeframe, kitchen conditions, and intended use. For spreading on bread or toast, any method that produces spreadable consistency works perfectly. For creaming into cake batter or cookie dough, the gentler methods that produce uniformly softened butter without any warm spots deliver superior results. With these techniques at your disposal, frozen butter transforms from kitchen obstacle to manageable ingredient in under an hour—or just minutes when needed urgently. By understanding the science behind butter softening and applying these practical methods, you’ll never let rock-hard freezer butter ruin your baking plans again.