How to Remove Freezer Panel: Easy Steps
Your freezer suddenly stops cooling properly, and you suspect frost buildup behind the interior panel. Before you can inspect the evaporator coils or defrost heater, you need to safely remove that stubborn freezer panel. This critical first step in freezer repair often stumps DIYers who encounter unexpected clips, hidden screws, or fragile components. Getting this wrong could damage your appliance or create electrical hazards. In this guide, you’ll learn exactly how to remove freezer panels from popular models including Whirlpool, GE, Samsung, and Frigidaire units—without breaking plastic components or voiding your warranty. You’ll discover where manufacturers hide fasteners, how to identify your specific panel type, and professional techniques for safe removal that prevent costly mistakes.
Identifying Your Freezer Panel Type Before Starting

Freezer panels aren’t one-size-fits-all. Before grabbing tools, determine your panel type to avoid damaging fragile components during removal. Most modern freezers use either snap-in panels secured by plastic clips or screw-mounted panels requiring specific fastener removal. Whirlpool and Maytag models typically feature rear wall panels with hidden lower clips that release upward, while Samsung and LG units often have front-facing panels secured by discreet screws behind the ice maker assembly. Frigidaire models frequently use a combination of visible screws at the bottom and hidden clips at the top. Look for subtle seam lines—panels with completely seamless edges likely use hidden clips, while those with visible screw covers at corners require screw removal first.
How to Locate Hidden Fasteners on Your Freezer Panel
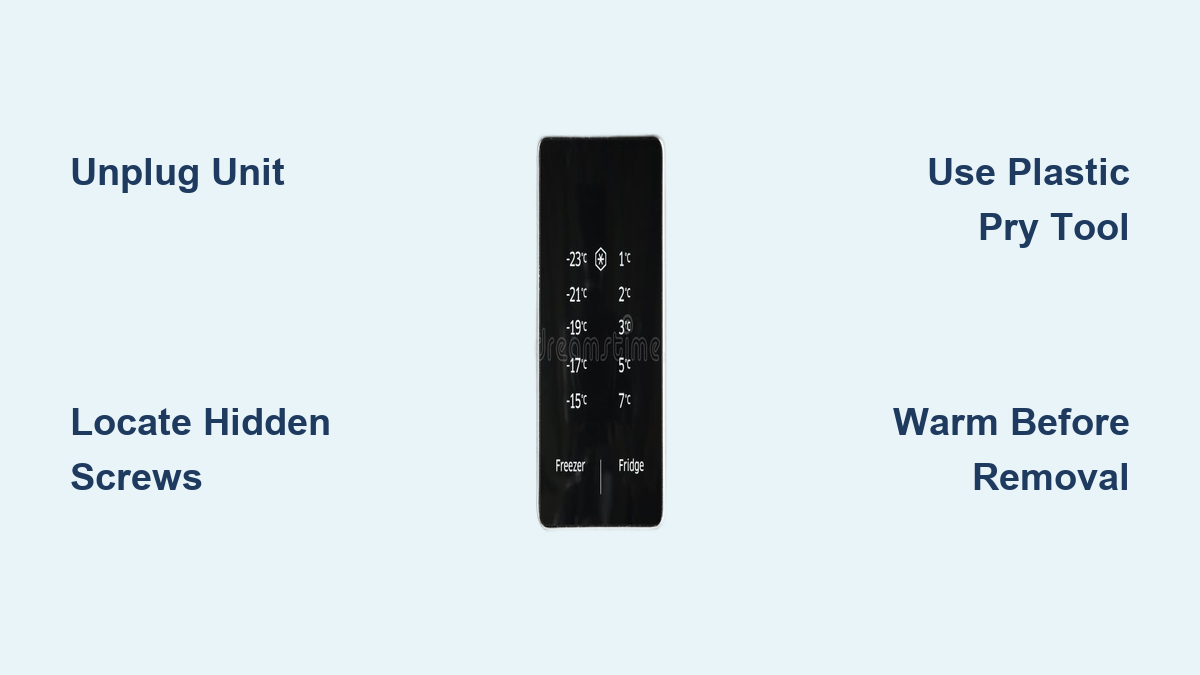
Manufacturers deliberately conceal fasteners to maintain clean aesthetics, creating frustration for repairers. Start your inspection at the bottom edge where fasteners are most accessible. Run your finger along the seam—many models have small access holes or dimples indicating screw locations beneath. For Whirlpool units, check behind the ice maker storage bin; Samsung panels often hide screws beneath the ice maker assembly. Frigidaire models typically conceal fasteners under the lower toe plate. If you see no visible screws, your panel likely uses plastic retaining clips. Gently insert a plastic pry tool at the bottom center and work outward—most panels release from the bottom first before lifting upward.
Common Panel Identification Mistakes That Cause Damage
Many DIYers mistake the evaporator cover for the main back panel, leading to unnecessary disassembly. The evaporator cover is usually a smaller, removable plastic grid directly in front of the cooling coils, while the main back panel spans the entire rear wall. Another critical error: applying force before releasing all fasteners. Plastic retaining clips break easily when pulled unevenly—always confirm all fasteners are released before attempting panel removal. Never use metal tools for initial disengagement; the $5 plastic trim removal kit prevents scratches and breaks that occur with screwdrivers or putty knives.
Essential Tools for Safe Freezer Panel Removal

You don’t need specialized equipment, but having the right tools prevents costly damage. Every freezer panel removal requires a plastic trim removal kit with multiple pry tools—metal implements will scratch or crack plastic components. For models with hidden screws, include a set of T15 and T20 Torx bits (most common in modern appliances) plus standard Phillips heads. Keep electrical tape and twist ties ready for managing disconnected wiring harnesses. Crucially, have a soft towel or blanket to place panels on during work—landing on a hard floor often cracks brittle, cold plastic.
Model-Specific Tool Requirements Checklist
- Whirlpool/Maytag: T15 Torx bit, plastic pry tools #2 and #3, flashlight
- Samsung/LG: T20 Torx bit, putty knife (wrapped in tape), nut driver set
- Frigidaire: 1/4″ nut driver, flathead screwdriver (for toe plate), panel support prop
- GE: Phillips #2, plastic wedges, wiring diagram (often inside control panel)
Step-by-Step Freezer Panel Removal Process
Preparing Your Freezer for Safe Disassembly
Begin by unplugging the unit—never work on appliances while powered. Remove all food and shelves to create workspace. For bottom-mount freezers, pull the entire unit away from the wall at least 18 inches. Set up proper lighting; the interior becomes extremely dark once you start removing components. Place a towel at the base to catch frost melt. Most critically, allow the freezer to warm to at least 40°F before starting—cold plastic becomes brittle and snaps easily during removal. This warming period (typically 2-3 hours) prevents the most common cause of broken panels.
Removing Whirlpool and Maytag Freezer Panels
Start by removing the ice maker assembly if present—most models require this to access upper fasteners. Locate the two T15 screws at the bottom edge of the rear panel, usually visible once you remove the lower basket. Insert your plastic pry tool at the bottom center seam and gently twist to release the first clip. Work outward toward the sides, listening for the distinctive “pop” of each clip releasing. Once the bottom edge is free, support the panel with one hand while releasing the top clips—these often require upward pressure rather than outward. Never pull straight out; Whirlpool panels release on a slight upward angle.
Samsung and LG Panel Removal Without Damaging Ice Maker Components
Samsung’s integrated ice makers create unique challenges. First, remove the ice bucket and disconnect the wiring harness at the ice maker module. Locate the two T20 screws behind the ice maker assembly—these often require a nut driver due to tight clearance. Gently pry the top edge near the ice maker first, as this section typically has weaker clips to accommodate ice maker movement. Support the panel’s weight as you release the bottom clips; Samsung panels are heavier than most due to integrated wiring channels. Keep the wiring harness connected until the panel is partially removed—suddenly disconnecting can damage delicate ribbon cables.
Troubleshooting Stuck or Broken Panel Components
When Clips Won’t Release Despite Proper Technique
If clips resist release after correct prying, check for frost buildup along the seam—this common issue glues panels in place. Use a hair dryer on low heat (never high) to gently melt bonding frost, moving constantly to avoid melting plastic. For persistent resistance, insert multiple plastic wedges around the stuck area to distribute pressure evenly. Never apply force to a single point; this concentrates stress on individual clips. If you hear cracking sounds, stop immediately—you’re likely bending the mounting flange rather than releasing the clip.
Repairing Broken Retaining Clips During Removal
Broken clips happen even to professionals. Before panicking, check if the broken clip segment remains in the panel or housing—sometimes you can reinsert it temporarily. For immediate repair, use plastic epoxy designed for appliances (never regular superglue). Apply minimally to the broken tab, hold in position for 90 seconds, then let cure fully before reassembly. For long-term fixes, order replacement clips matching your model number—most manufacturers sell individual clips for under $5. Never rely solely on screws if clips break; uneven pressure causes panel warping and cooling issues.
Reassembly and Post-Removal Checks
Proper Panel Reinstallation Sequence to Prevent Future Issues
Reassembly requires equal precision—forcing panels back incorrectly creates air leaks that cause excessive frost. Start by aligning the top edge first, then gently press the bottom into place. Most panels require a firm, even push along the entire bottom edge to fully engage all clips. Listen for consistent clicking sounds—missing clicks indicate unseated clips that will cause panel vibration. Before restoring power, verify all wiring harnesses are fully seated and secured with original twist ties. Never skip the 30-minute stabilization period after reassembly before plugging in—this allows components to equalize temperature.
Critical Post-Removal System Checks Before Restoring Power
After panel reinstallation but before plugging in, perform three essential checks: First, inspect all wiring connections for pinched or damaged insulation—this causes 40% of post-repair failures. Second, verify the evaporator fan spins freely with no obstructions. Third, confirm the defrost timer and heater connections are secure. Plug in the unit but stay nearby for the first 30 minutes—listen for abnormal noises and check that the evaporator fan activates within 5 minutes. Monitor for proper cooling over 24 hours before restocking food.
Preventing Future Panel Removal Difficulties
Create easier access for future maintenance by applying silicone-based lubricant to all clip channels during reassembly—this reduces friction during next removal. Keep a dedicated freezer repair kit with model-specific tools in your garage. Most importantly, address minor issues immediately—frost buildup makes panel removal exponentially harder over time. Schedule quarterly visual inspections behind panels to catch problems early when they’re simpler to fix.
Final Note: Mastering freezer panel removal transforms daunting repairs into manageable tasks. By identifying your specific panel type, using proper tools, and following model-specific techniques, you avoid costly damage while diagnosing cooling problems. Remember that patience with frozen components prevents most repair disasters—always allow adequate warming time before starting. If you encounter persistent issues after panel removal, consult your model’s service manual for advanced diagnostics before proceeding further. With these techniques, you’ve taken the critical first step toward restoring your freezer’s performance without professional service costs.