How to Switch Freezer Door Swing Side
Your kitchen layout shouldn’t work against you. When your Whirlpool refrigerator’s freezer door swing interferes with traffic flow or doesn’t accommodate your accessibility needs, reversing the door direction becomes a practical solution. Many homeowners successfully complete this freezer door side change themselves with proper preparation, while others benefit from professional assistance. The key to a successful modification lies in understanding whether your specific model supports door reversal and following the correct procedure for your refrigerator configuration. This guide provides the essential framework you need to determine if changing your freezer door side is feasible for your Whirlpool appliance and how to approach the process correctly.
Before grabbing your tools, recognize that not all refrigerator designs accommodate door reversal. Bottom freezer models, side-by-side units, and French door configurations each have unique requirements, and attempting modification on an incompatible model could damage your appliance. The time investment varies based on your model and experience level, but proper preparation prevents wasted effort and potential damage to your refrigerator. Whether you complete this project yourself or schedule professional service, understanding the process ensures your freezer door functions perfectly in its new orientation.
Confirm Your Whirlpool Model Supports Door Reversal
Determining compatibility is your critical first step before attempting how to change freezer door side on your Whirlpool refrigerator. Not all models permit this modification, so consulting your specific documentation prevents wasted effort and potential damage. Locate your model number, typically found inside the refrigerator compartment along the side wall or door frame, then visit Whirlpool’s official manuals and literature page to access your model’s specific instructions.
When reviewing your documentation, pay special attention to sections labeled “installation guide” or “door reversal instructions.” These will explicitly state whether your model supports door reversal and what specific components you’ll need. If the online resources remain unclear, call Whirlpool customer service at 1-866-698-2538 for definitive confirmation—this single call could save you hours of unnecessary work. Bottom freezer models generally support reversal more readily than French door configurations, but your specific model number determines what’s possible.
Collect Required Tools and Reference Materials
Gathering everything before starting prevents frustrating interruptions mid-project. For most Whirlpool door reversal procedures, you’ll need:
- Phillips head screwdriver
- Flat-head screwdriver
- Adjustable wrench or socket set
- Small container for organizing screws and small parts
Unlike some appliance repairs, door reversal typically doesn’t require specialized tools, but model-specific components may be necessary. Check your documentation to determine if you need additional hardware such as hinge assemblies, decorative plugs, or cover pieces that hide mounting holes on the opposite side. If replacement parts are required, the customer service team can provide exact part numbers and direct you to authorized sources—using manufacturer-approved components ensures proper fit and maintains your warranty coverage.
Access Model-Specific Door Reversal Instructions
Never attempt door reversal without your model’s official documentation—generic guides can lead to mistakes with your specific Whirlpool refrigerator. The manufacturer’s installation guides contain crucial details including:
- Precise torque specifications for hinge hardware
- Component locations unique to your refrigerator configuration
- Safety warnings specific to your model
- Required sequence for disassembly and reassembly
These instructions are accessible through multiple channels. Download the PDF manual from Whirlpool’s website for easy reference during your project, or consider watching related video resources that demonstrate similar procedures like handle replacement on bottom freezer models. These visual aids help you understand the general approach even if specific reversal steps differ. For real-time guidance on specific questions, keep the customer service number (1-866-698-2538) handy throughout your project.
Create an Optimal Workspace Before Starting
Your preparation workspace directly impacts project success when learning how to change freezer door side. Clear a path around your refrigerator to allow movement on all sides, and protect your flooring with old towels or cardboard to prevent scratches from dropped tools. Having a second person available provides crucial assistance during door removal and reinstallation—this extra set of hands stabilizes the door and prevents accidental damage.
Before removing any components, document your current configuration with multiple photographs from different angles. These visual references prove invaluable during reassembly when you’re trying to remember exactly how each piece was oriented. Additionally, unplug your refrigerator and empty all door shelves—working with a lighter, empty door simplifies handling significantly. These preparation steps take only minutes but prevent costly mistakes during the reversal process.
Transfer Top and Bottom Hinge Components
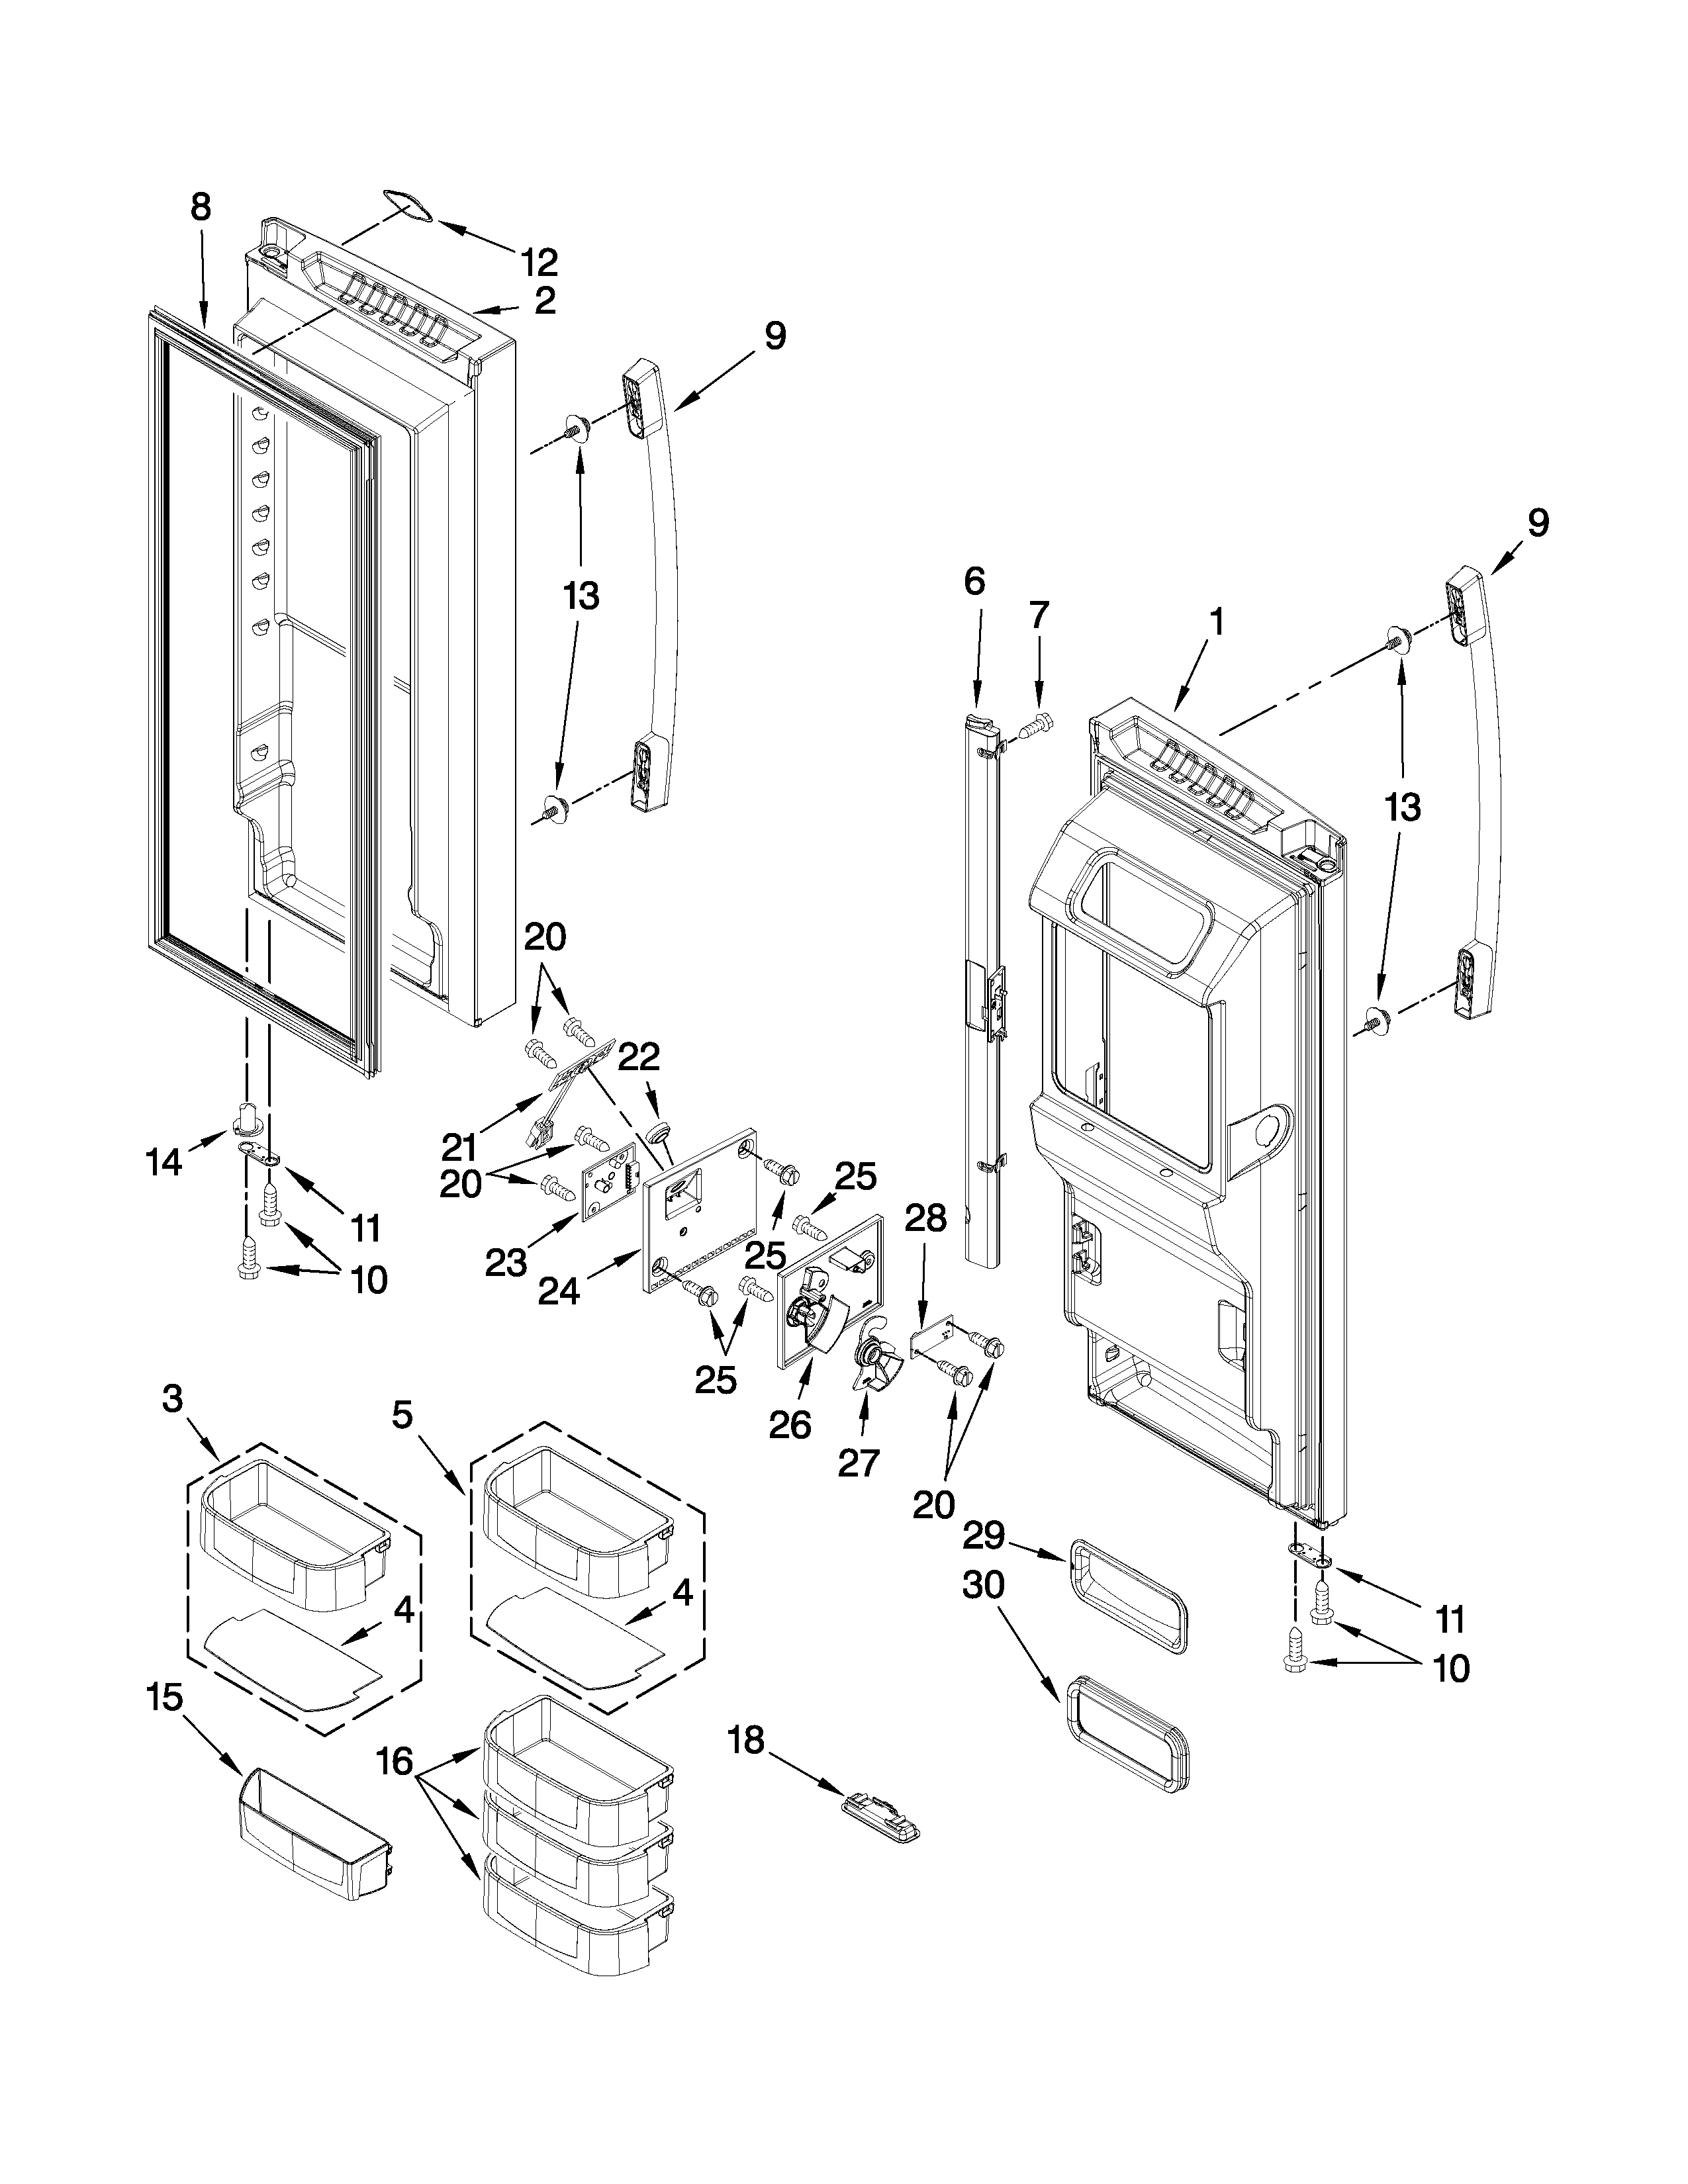
The mechanical heart of how to change freezer door side involves repositioning hinge hardware to the opposite side of your refrigerator cabinet. Begin by carefully removing screws securing the top hinge to the cabinet frame while supporting the door—never let it hang unsupported. With the top hinge removed, lift the door upward away from the bottom hinge pin and set it aside safely. You’ll notice plugs or caps covering additional screw holes; these are intended for the opposite swing direction.
For the bottom hinge, which bears more weight than the top, remove screws while supporting the door, then lift the door free. Clean the mounting surface before positioning the hinge on the opposite side, ensuring proper alignment with the door’s corresponding hole. Secure the hinge with appropriate screws, tightening sufficiently but avoiding overtightening that could strip the cabinet frame. Some models use different hinge designs for top versus bottom mounting, so consult your documentation to verify correct component placement.
Test Door Switch and Seal Performance
Modern refrigerators include door switches that control interior lighting and sometimes defrost systems—these may require adjustment after door reversal. With power restored to your refrigerator, test the door switch function by opening and closing the door several times. Listen for the characteristic click that indicates switch activation and verify that the interior light turns off when the door is fully closed.
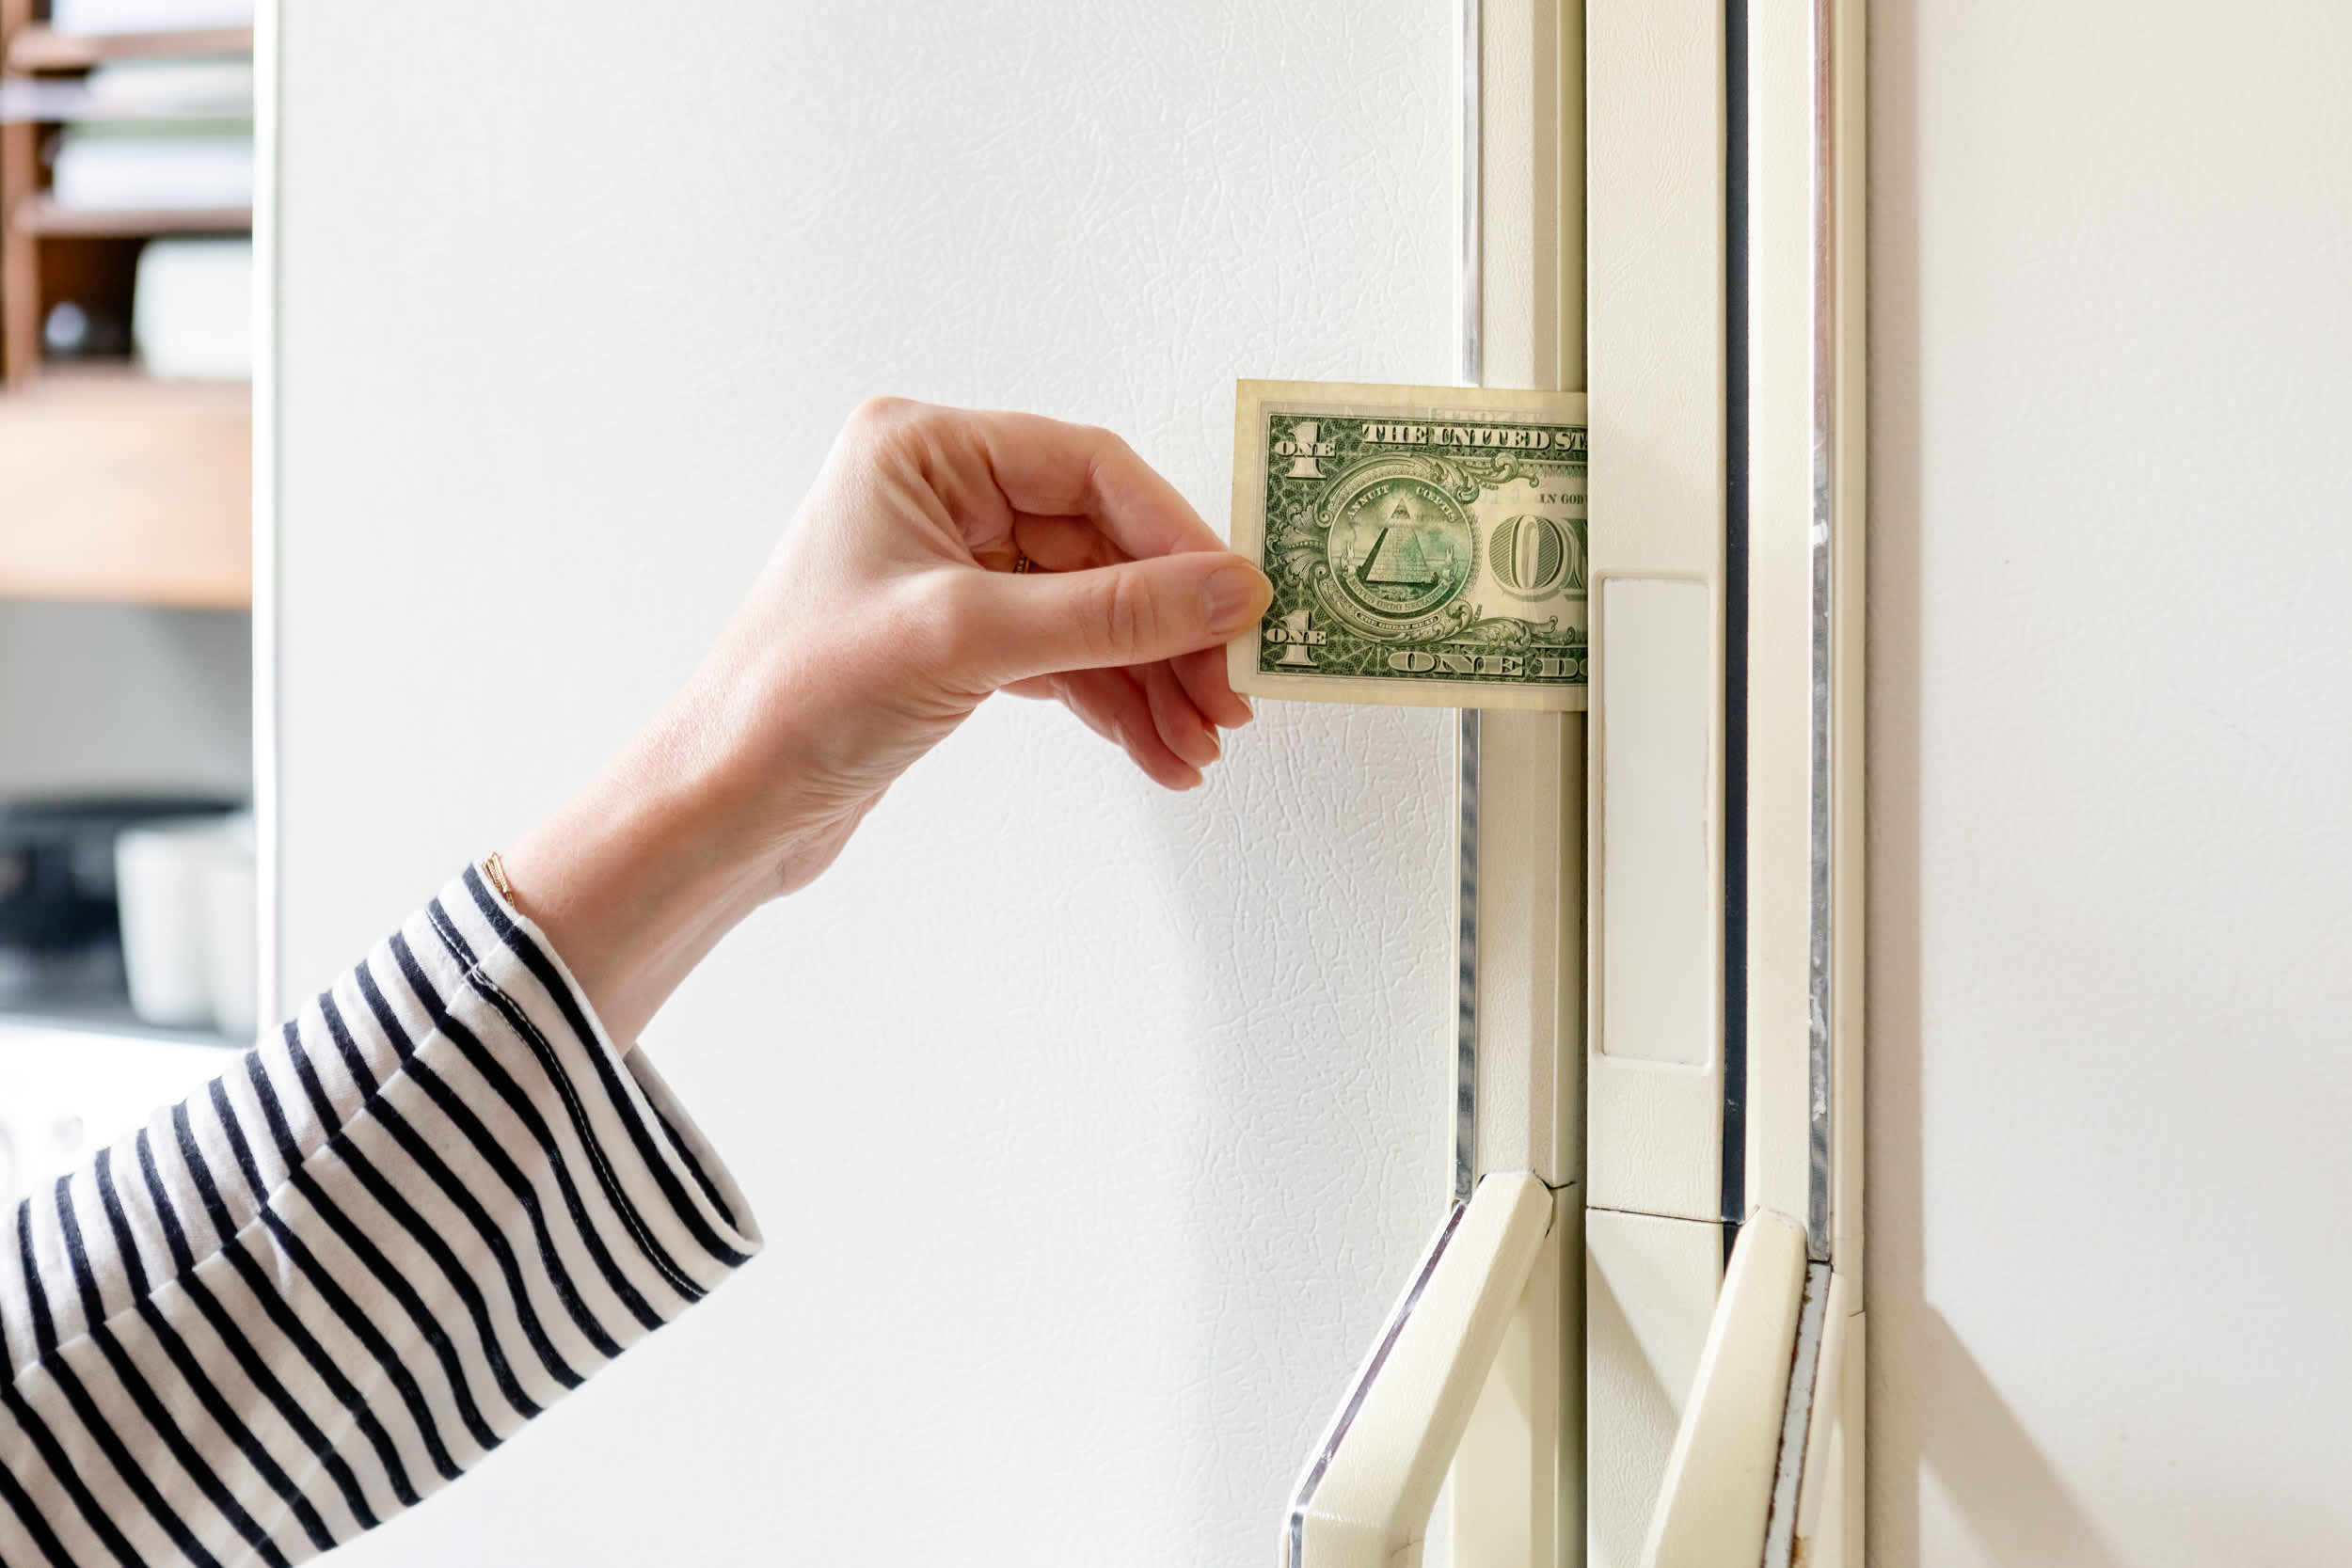
Perform a simple paper test to verify seal performance: close a dollar bill in the door frame at multiple points around the perimeter. A proper seal should hold the paper firmly enough that you feel resistance when attempting to pull it free. If the paper slides out easily at any point, check door alignment first—misalignment is the most common cause of poor seal performance after reversal. Persistent issues may indicate the need for professional adjustment to maintain optimal refrigerator efficiency.
Recognize When Professional Help Is Needed

While many Whirlpool owners successfully complete how to change freezer door side themselves, certain situations warrant professional service. Schedule technician assistance if:
- Your documentation indicates specialized tools or techniques are required
- You encounter stripped screw holes or broken components during the process
- The door won’t align properly despite following instructions
- Electrical issues develop with the door switch system
French door refrigerators and built-in models often have more complex reversal procedures that challenge even experienced DIYers. The customer service line at 1-866-698-2538 can help you assess whether your situation requires professional intervention and schedule appointments at your convenience. While this option costs more than DIY, it protects your appliance investment and ensures the modification functions correctly long-term.
Maintain Your Reversed Freezer Door
Once your door reversal is complete, proper maintenance preserves functionality for years. Periodically check hinge tightness—screws can gradually loosen with repeated door cycles, leading to developing misalignment. Clean the door gasket regularly with mild soap and water, inspecting for cracks or compression that might compromise the seal. If your documentation recommends it, lubricate hinge points annually with food-grade lubricant to maintain smooth operation.
Monitor how the door functions over time. Any developing rub, bind, or uneven gap indicates that minor adjustment may be needed before the problem worsens. Most alignment issues can be corrected by loosening hinge screws and making incremental adjustments—addressing these early prevents accelerated wear on components. By staying attentive to your refrigerator door’s performance, your successful freezer door side change will continue serving your kitchen layout needs reliably.
Changing your freezer door side successfully transforms how you interact with your kitchen space. The process requires careful preparation and attention to model-specific details, but most Whirlpool bottom freezer owners who approach the project methodically complete it without complications. Remember that professional service remains available through Whirlpool’s authorized repair network if the project exceeds your comfort level or unexpected complications arise. Whether you complete the reversal yourself or schedule expert assistance, the result—improved accessibility and better kitchen flow—makes the effort worthwhile when you know how to change freezer door side correctly.