How to Fix Idylis Freezer Not Working
That unsettling click when you plug in your Idylis freezer followed by complete silence is a familiar frustration for many owners. When your Idylis freezer not working scenario unfolds—especially with the distinctive clicking sound but no cooling action—it’s more than just an inconvenience; it threatens food safety and represents a potential financial setback. The IF71CM33NW model seems particularly susceptible to this issue around the four-year mark, suggesting specific component vulnerabilities in this design. Understanding exactly why your freezer has stopped functioning properly can save you unnecessary repair costs and help you determine whether a simple fix or complete replacement is your best path forward.
Before you panic about replacing your entire freezer, recognize that most compressor-related failures in Idylis units stem from predictable component failures. This guide provides a systematic approach to diagnosing why your Idylis freezer not working problem has occurred, walking you through each potential cause from simplest to most complex. You’ll learn how to identify whether the issue lies with easily replaceable parts or indicates a more serious internal failure that might warrant replacement rather than repair.
Decode Compressor Clicking Sounds
That distinctive clicking noise when you plug in your Idylis freezer isn’t random—it’s your start relay attempting (and failing) to engage the compressor. This specific symptom indicates power is reaching the relay system but something prevents the compressor from actually starting its cooling cycle. The relay clicks as it tries to initiate the compressor motor, but without follow-through rotation, your freezer remains completely unresponsive despite the electrical signal.
This clicking behavior appears most frequently in Idylis IF71CM33NW deep freezers around the four-year mark, suggesting a design limitation or component lifespan issue in this particular model. While four years might seem premature for major appliance failure, refrigeration components experience significant electrical stress during startup cycles that can cause predictable wear patterns. The clicking itself isn’t the problem—it’s a critical diagnostic clue that helps narrow your troubleshooting focus to the relay, capacitor, compressor windings, and associated wiring rather than broader electrical issues.
Test Start Relay Function
Your Idylis freezer’s start relay acts as the electrical switch that provides the initial power surge needed to kickstart the compressor motor. When this component fails, it often produces that characteristic clicking sound while failing to deliver sufficient power to the compressor. Relay failure ranks among the most common causes of Idylis freezer not working scenarios, making it the logical first component to test.
To properly test the start relay:
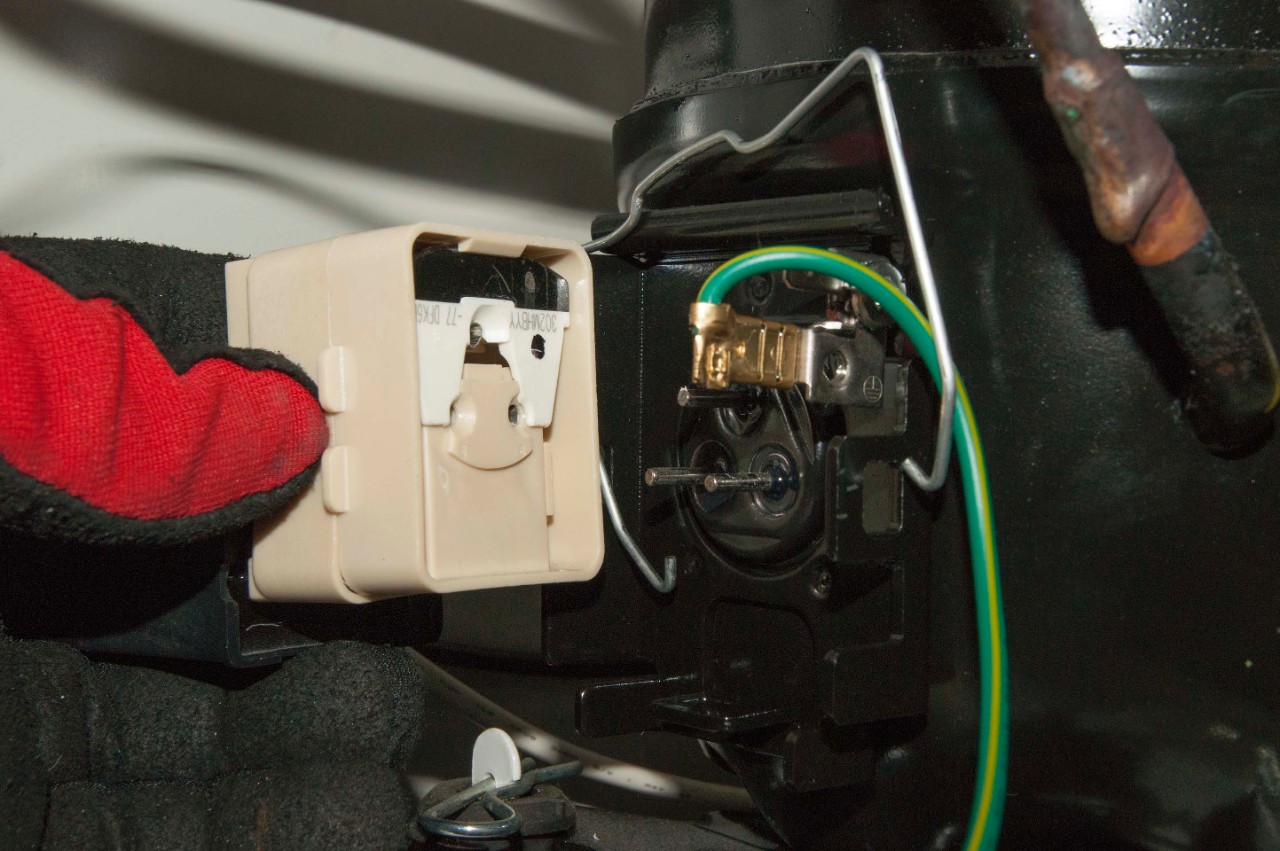
– Locate the relay (typically mounted directly on or near the compressor with a protective cover)
– Remove the cover and inspect for visible damage like burning, melting, or corrosion
– Test for continuity using a multimeter set to continuity mode
– Check for proper electrical connection between specific terminals
Warning: Always unplug your freezer before accessing internal components. Many Idylis owners make the mistake of replacing the relay without proper testing, only to discover the clicking persists. This happens because either the relay wasn’t the root cause, or the replacement part itself was defective. Proper testing prevents wasted time and money on unnecessary parts.
Check Start Capacitor Health

Working alongside the start relay, the start capacitor provides the necessary electrical boost to overcome compressor inertia during startup. Without a functioning capacitor, your Idylis freezer not working problem persists because the compressor lacks the initial torque needed to begin rotating. Capacitor failure represents another leading cause of compressor startup issues in Idylis units.
Testing capacitor health requires:
– Locating the cylindrical or oval-shaped component near the relay
– Setting your multimeter to capacitance mode (if available)
– Checking if the capacitor holds and releases charge appropriately
– Verifying capacitance values match the rating printed on the component
If your multimeter lacks capacitance testing capability, perform a basic continuity check by briefly touching probes to the terminals. A healthy capacitor shows brief deflection before returning to zero, while a faulty one shows no movement or constant continuity. Always discharge capacitors before handling—they can store dangerous electrical charges even when unplugged.
Verify Voltage Supply to Compressor
Before replacing additional components, confirm whether electrical power actually reaches your compressor when the relay clicks. This critical diagnostic step requires a multimeter and extreme caution when working with live electrical components. If you’re uncomfortable with this procedure, skip to professional help immediately.
With your freezer plugged in and clicking:
– Carefully insert multimeter probes into the compressor terminal housing
– Measure voltage between common terminal and both start/run terminals
– Expect to see approximately 120V or 240V (depending on your region)
If voltage measurements confirm power delivery but the compressor remains unresponsive, the problem lies within the compressor assembly itself. This eliminates relay and wiring issues as primary causes. Conversely, if no voltage reaches the compressor terminals during clicking, the issue exists somewhere in the relay or control systems between the outlet and compressor.
Inspect Electrical Connections
Vibration from normal compressor operation gradually loosens terminal connections, while heat cycles cause insulation degradation over time. Damaged or corroded wiring represents a surprisingly common culprit behind Idylis freezer not working scenarios that often gets overlooked during initial troubleshooting.
When inspecting connections:
– Unplug the freezer completely before examination
– Remove access panels to expose compressor area and relay housing
– Examine each wire for heat damage, fraying, or insulation breakdown
– Check terminals for corrosion, especially where different metals join
If you discover corroded terminals, disconnect affected wires, clean with a wire brush, and reconnect securely. For wires showing significant damage, replacement is necessary. Pay special attention to ground connections—faulty grounding can cause intermittent or complete failure even when other components test properly.
Test Compressor Windings

Internal motor windings within the compressor can develop faults that prevent rotation entirely. Testing these windings for proper resistance values identifies whether your compressor has suffered internal damage that typically requires professional repair or complete replacement.
To test compressor windings:
– Access the three terminal pins labeled common (C), start (S), and run (R)
– Set multimeter to resistance mode (ohms)
– Measure resistance between each pair of terminals
– Compare readings against expected specifications
You should see low resistance between C-S and C-R, with higher resistance between S-R. Any infinite resistance reading indicates a broken winding requiring compressor replacement. Similarly, readings showing extreme deviation from specifications suggest internal damage. Also check for continuity between terminals and the compressor body—any reading here indicates grounded windings that necessitate replacement.
Clean Condenser Coils
While dirty condenser coils typically cause gradual performance degradation rather than complete failure, severely contaminated coils can contribute to compressor stress that leads to premature component failure. The condenser coils release heat extracted from the freezer interior, and when coated with dust or debris, they cannot effectively dissipate this heat.
Cleaning procedure:
– Locate coils (typically on back, bottom, or behind rear panel)
– Use a coil brush or vacuum with soft brush attachment
– Gently remove accumulated debris without bending delicate fins
– Maintain several inches of clearance around coil area after cleaning
This maintenance task won’t fix a completely non-working freezer, but regular cleaning extends the service life of all refrigeration components and can prevent future failures. Perform this cleaning at least twice annually, or more frequently if you have pets or live in a dusty environment.
Weigh Repair vs Replacement Costs
When compressor clicking issues persist after relay and capacitor replacement, the cumulative expense often exceeds the appliance’s value. For Idylis IF71CM33NW models experiencing compressor failure, professional repair typically involves compressor replacement plus refrigerant recharge and labor costs that frequently approach or exceed the cost of a comparable new freezer.
Use this practical guideline: if total repair costs exceed half the replacement cost of a similar new freezer, replacement is usually wiser. For the IF71CM33NW specifically, this threshold is relatively low given the unit’s age and documented pattern of compressor issues around the four-year mark. Consider warranty coverage on new purchases, energy efficiency improvements in newer models, and whether current capacity meets your needs when making this decision.
Know When to Hire a Professional
Certain diagnostic and repair steps require specialized tools and technical knowledge beyond safe DIY troubleshooting. Recognizing your limits prevents personal injury, additional appliance damage, or voiding remaining warranty coverage. Professional technicians possess equipment to safely test refrigerant pressures and verify proper component operation.
Seek professional service when:
– Compressor motor failure is confirmed by abnormal winding readings
– Issues involve refrigerant handling or suspected leaks
– Electrical testing indicates problems beyond simple component replacement
– Your freezer remains under warranty (DIY repairs may void coverage)
A professional diagnosis typically costs less than $200 and provides definitive answers about your Idylis freezer not working problem. This investment helps you make informed repair versus replacement decisions rather than guessing or replacing unnecessary parts.
When your Idylis freezer not working issue presents with that characteristic clicking sound, methodical troubleshooting through relay, capacitor, and compressor testing will identify the specific cause. Regular maintenance like condenser coil cleaning prevents many future failures, while understanding the economic threshold for repair versus replacement ensures smart investment decisions. For the IF71CM33NW model specifically, compressor failure around the four-year mark often makes replacement more practical than expensive professional repairs. By following this diagnostic sequence, you’ll restore reliable frozen food storage to your home with the most cost-effective solution for your specific situation.